Most young boys (and some adventurous girls) play with Toy Soldiers; some never stop! I'm proud to say that I am one that never has stopped. Toy Soldiers, painting the figures, history and miniature wargaming is what this site is all about. May the God who gives encouragement give you the same attitude of mind toward each other that Christ Jesus had, so that with one mind and one voice you may glorify the God and Father of our Lord Jesus Christ.
As an Amazon Associate I earn from qualifying purchases
Saturday, December 31, 2011
4th Swiss Ready to Deploy
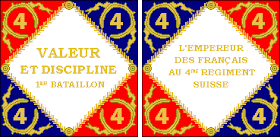
I finished the base of the 4th Swiss last night and they are now ready to march from their depot and head to the Peninsular for the glory of the Emperor of France!
Thursday, December 29, 2011
The Battle of Friedchikun - The Set-up
Finally played the Battle of Friedchikun which is based on the Battle of Friedlingen scenario from The Volley and Bayonet page which was fought between the French and Imperial Forces on October 14th, 1702. The French are commanded by Honorable Son #2 with yours truely commanding two of the French Infantry Divisions. Honorable Son #4 is commanded the Imperials. Most units in the order of battle were not actually at the real battle - those are the units that I have painted. First the Imperial Army:
Markgraf Ludwig Wilhelm von Baden-Baden AC
Left (Infantry) Wing, 1st Line. Feldzugmeister Graf K. E. von Furstenberg-Mosskirch DC Exhaustion=5
- Inf Regt Alt Salm M6 [ ] [ ]
- Inf Regt Wallis M5 [ ] [ ]
- Inf Regt D’Arnant M5 [ ] [ ]
- Dragoon Regt Prinz Eugene M5 [ ] [ ]
- Field Artillery Bty M5 [ ] [ ]
Left (Infantry) Wing, 2nd Line. Feldmarschallleutnant Graf P. von Furstenberg-Stuhlingen DC Exhaustion=4
- Inf Regt Prince George M5 [ ] [ ]
- Inf Regt Wallon M6 [ ] [ ]
- Inf Regt Konigsegg M5 [ ] [ ]
Centre (Reserve) Column. Feldmarschalleutnant Graf Arco DC and Feldmarschalleutnant Graf Erffa DC Exhaustion=4
- Maximillian Converged Grenadiers M6 [ ] [ ] g
- Converged Grenadiers M6 [ ] [ ] g
- Bayreuth Dragoons M5 [ ] [ ]
- Field Artillery Bty M5 [ ] [ ]
Right (Cavalry) Wing, 1st Line. Feldmarschalleutnant Furst von Hohenzollern DC Exhaustion=3
- Kuirassiere Regt Lobkiwitz M6 [ ] [ ]
- Kuirassiere Regt Alt-Hanover M6 [ ] [ ]
- Austrian Dragoon Regt Sachsen-Heilburg M5 [ ] [ ]
Right (Cavalry) Wing, 2nd Line. Feldmarschalleutnant Baron von Stauffenberg DC Exhaustion=3
- Kuirassiere Regt Darmstadt M6 [ ] [ ]
- Kuirassiere Regt Cusanin M6 [ ] [ ]
- Dragoon Regt d’Odom M5 [ ] [ ]
Detached Garrisons
- Baden-Durlach Militia Bn in Sternschanze M4 [ ] m/sk
- Baden-Durlach Militia Bn in Schloss Friedlingen M4 [ ] m/sk
Lt Genl Marquis de Villars AC
Detached Garrisons
- Regt La Marche (part) on the Schusterinsel M5 [ ] sk
- Schusterinsel Battery (field guns) M5 [ ]
Left (Cavalry) Wing, 1st Line. Genl Comte de Magnac DC Exhaustion=4
- French Cavalry Bde Heudincourt M5 [ ] [ ]
- French Cavalry Bde Vileroy M5 [ ] [ ]
- French Cavalry Bde Colonel-General M5 [ ] [ ]
- French Cavalry Bde Fiennes M5 [ ] [ ]
- Artillery Bty 1 M5 [ ] [ ]
- Artillery Bty 2 M5 [ ] [ ]
- Artillery Bty 3 M5 [ ] [ ]
Left (Cavalry) Wing, 2nd Line. Lt Genl Marquis de Merde-Tete DC Exhaustion=4
- French Dragoon Bde Boufflers M4 [ ] [ ] d
- French Dragoon Bde Royal M4 [ ] [ ] d
- French Dragoon Bde Dauphin M4 [ ] [ ] d
- Converged Grenadiers M6 [ ] [ ] g
Centre (Reserve) Column. Colonel le Comte de Robecq DC Exhaustion=3
- Regt Germain M5 [ ] [ ] [ ]
- Regt Grancey M5 [ ] [ ] [ ]
Right (Infantry) Wing, 1st Line. Lt Genl des Bordes DC Exhaustion=7
- Regt Sillery M5 [ ] [ ] [ ]
- Regt Reynold M5 [ ] [ ] [ ]
- Regt Bearn M5 [ ] [ ] [ ]
- Regt Soissonais M4 [ ] [ ] [ ]
Right (Infantry) Wing, 2nd Line. Lt Genl a Plombe DC Exhaustion=7
- Regt Greder M5 [ ] [ ] [ ]
- Regt Rochembeau M5 [ ] [ ] [ ]
- Regt Normandie M5 [ ] [ ] [ ]
- Regt Picardie M5 [ ] [ ] [ ]
All Infantry on Linear stands on both sides have dedicated guns.
The objective for the Imperial Army is simple: Stop the French from getting either to the bridge or the other road behind the small town of Friedchikun. We decided that the game would be 8 turns in length and that the French, as the attackers, would go first.
The above is the view of the Austrian lines from the French lines. The Austrian infantry divisions are on their left flank, grenadiers and most artillery in the center, and cavalry on the right. As the Imperial commander, Honorable Son #4 has established a bowl-shaped engagement area to the front of Friedchikun with the cavalry poised to take advantage of any wavering French attacks. The green fault outlines the forested areas.
A better look at the Austrian deployment with the French at the top of the picture. The French are virtually a mirror deployment of the Austrians: Infantry on the right flank, artillery and reserve in the center with the cavalry on the right.
The French guns are not pointing the wrong way; that's how we show which guns are limbered. I have some horses and limbers from Editions Brokaw that I need to paint for limber markers.
The steady ranks of the Imperial infantry. I really need to finish the flocking on the bases!
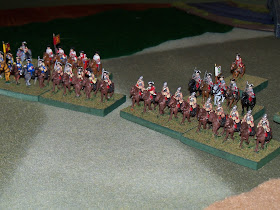
The Imperial Cavalry.
The French Attack commences.
Monday, December 26, 2011
4th Swiss Regiment WIP #2
After painting and adding the packs to the the figures, I think that the packs without bedrolls may be for the figures in overcoats. Oh well, the figures will stay and fight in "climate controlled" battlefields so I don't think they will be too uncomfortable.
Whoops! Just noticed some blue paint on the white turnback I'll need to paint over.
I still need to print off a flag, add a label to the base (forgot to put that on first before gluing the figures!) and then add some flocking and terrain to the base.
Sunday, December 25, 2011
Thursday, December 22, 2011
4th Swiss Regiment WIP
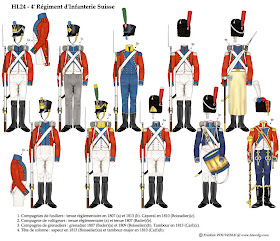
My infantry brigades for Volley and Bayonet usually have 8 figures mounted per stand. The 4th Swiss will have an officer, standard bearer, drummer, 3 fusiliers and 2 grenadiers to "steady" the line.
Interestingly, most French infantry and allies had red epaulettes for the grenadier units; the 4th Swiss appears to have had white epaulettes.
Saturday, December 10, 2011
French Peninsular Army (and allies!) for Volley and Bayonet
I've painted 2 Army Commander stands so far, the Emperor Napoleon and Marshal Soult. The Emperor will not be in many of the future battles to be fought - but hey, ya gotta have him in your collection if you have the French. I'm pretty sure it's a rule somewhere. After organizing it looks like I have a few extra marshals and generals lying around so I may do a third Army Commander stand for Marshal Massena.
The units below that are in bold black font are already painted and (S) means "skirmish" stand. Need means I need to purchase!
Army Commander - The Emperor Napoleon
Army Commander - Marshal Jean-de-Dieu Soult
I Corps d'Armee Commander - Marshal Victor or Davout
1st Division Commander - General Foy
9th Legere (Light Infantry)
18th Ligne (Line Infantry)
25th Ligne
Division Artillery (Have figures, need gun)
2nd Division Commander - General Marchand
15th Legere
8th Ligne
30th Ligne
4th Swiss Ligne
Division Artillery (Have figures, need gun)
Corps Troops
5th Chasseurs
IV Corps d'Armee Commander - Marshal Ney
1st Division Commander - General Sebastiani
12th Legere
28th Ligne
54th Ligne
Division Artillery (Have figures, need gun)
2nd Division Commander - General Valence
16th Ligne
18nd Ligne
21th Ligne
Division Artillery (Have figures, need gun)
3rd (German) Division Commander - Gen Leval
1st Regiment, Grand Duchy of Berg
Hesse-Darmstadt Gross und Erbprinz
Anhalt Regiment
4th Polish Regiment (Need)
Division Artillery (Need figures and gun)
Corps Troops
10th Chasseurs
Light Cavalry Division Commander - General Desnouettes
7th Chasseurs
2nd Hussars
1st Dragoon Division Commander - General Fournier
1st Dragoons
9th Dragoons
14th Dragoons
Horse Artillery (Have gun, need figures)
2nd Dragoon Division Commander - General Milhaud
12th Dragoons
25th Dragoons
1st Hussars or 3rd Dutch Hussars
Horse Artillery (Have gun, need figures)
Imperial Guard Commander - Marshal Bessieres
Grenadiers a pied
Chasseurs a pied
Chasseurs a cheval
The Imperial Guard units can also be used for units of converged grenadiers and the Spanish King's guard. I have 4 painted Skirmish stands and I plan on painting 5 more.
Now that both sides are organized - time to get painting again. My goal is to get the 4th Swiss painted in the next week and then do another French Infantry unit. After that - back to the British!
Monday, November 28, 2011
4th Swiss Regiment
To fight the British in the Peninsular you need some French. I still have not organized the Emperor's troops for Volley and Bayonet yet, but I envision an army consisting of at least 2 Infantry Corps with 2 to 3 Infantry Divisions and corps support (artillery and cavalry), 4 divisions of cavalry and elements of the Imperial Guard.
One of the great things about the gaming hobby that I enjoy is the research of the units and organization of the armies, but still getting to pick which units I want to deploy. The 4th Swiss Regiment did fight in the Peninsular and will now be a regular feature of the Emperor's forces on my tabletop.
I haven't had much time to paint the last few weeks, but I did get a chance to paint a "test" figure using Perry Miniatures' plastic French Infantry. The 4th Swiss will add a splash of red color to the French forces and highlight, though the Swiss were part of the regular French military establishment, that there were quite of few non-French forces fighting with the French.
I wanted the red coats of the Swiss to look differently than the red coats I had painted for the British forces. The way I paint the British jackets (all paints are from the GW range) is to prime the figure black, use Scab Red as the base color and then use Blood Red to build up the highlights. For the Swiss, I just went with Blood Red and this seems to me to give a slightly brighter color. Though not finished, I like the way the test figure looks and look forward to finishing it and the rest of the unit.
Here are the colors I'm using for the 4th Swiss:
Coat: Blood Red
Facings: Enchanted Blue
Belt Straps: Skull White
Shako Cover: Desert Yellow
Trousers/Coveralls: Codex Grey then Skull White
Musket: Scorched Brown for the wood; Chainmail for the metal
Water Gourd strap: Bestial Brown
Water Gourd: Snakebite Leather
Pom pom: Snot Green
Pack: Scorched Brown then Bestial Brown. Highlight with Snakebite Leather
Blanket roll: Adeptus Battlegrey
Cartridge box, Shako brim and boots: Chaos Black
Face and hands: Dwarf Flesh and then a Flesh wash. Highlight with Elf Flesh.
Buttons: Sunburst Yellow.
Straps can be tough to paint sometimes - getting around all the gear that a soldier carries. I love the way the Perry figures are designed. Paint the straps, then the pack and then glue that pack on the figure!
The packs with the swords are for the figures of the elite companies.
Here's the rest of the unit. I usually place 8 figures to an Infantry brigade - time to get them outfitted! The guy without arms will be a voltigeur for one of my French skirmish stands.
Sunday, November 20, 2011
The 88th Foot (Connaught Rangers) Complete
Rumor has it that the Emperor of France is demanding equal time from the painting depot and that several regiments of line and light infantry may be on the way.
Tuesday, November 15, 2011
Wings of War
Airplanes are represented by a single card which is used as a playing piece on any open surface. Each turn the opposing players choose 3 movement cards and reveal their cards in order simultaneously to decide the actions of the airplane they control.
Movement is easy; line up the card with the card or model that represents your plane and just move it to the arrow. Each plane reveals a movement card at the same time and moves.
Different planes use different decks of movement cards to represent their different maneuver capabilities, and a deck of fire cards are used to take into account their fighting effectiveness and to keep track of damage.
Firing is simple - if your target is in range and within the zone of fire, your opponent draws a card from the fire deck.
The card may have 0 damage, any number of hits or other mechanical damage ranging from broken rudders to the plane catching on fire.
Damage cards are kept hidden from your opponent - unless your plane is smoking or on fire! Above I took 1 damage but my rudder was damaged. For the rest of the game I couldn't turn my Spad to the left.
The game has many expansion sets; the basic set comes with 23 different WW I planes. With the box set are also maneuver cards, 2 rulers and 5 gaming boards to organize the cards and keep track of damage.
There are also pre-painted miniatures designed for the game which are reasonably priced (thank you eBay!). Optional rules add more flavor and make the game more challenging with altitude and tailing.
I mentioned that the game is easy to learn - but it is one of those games that is hard to master! Trying to maneuver so as not to expose yourself to fire while trying to shoot down the other plane or planes is challenging . . . okay, I've only won once! Games take about 30 minutes to play.