As an Amazon Associate I earn from qualifying purchases

Showing posts with label Bwah hah hah!. Show all posts

Monday, June 23, 2025

The Boxer Rebellion Project, Part 5: Imperial Japanese Infantry Painting Guide


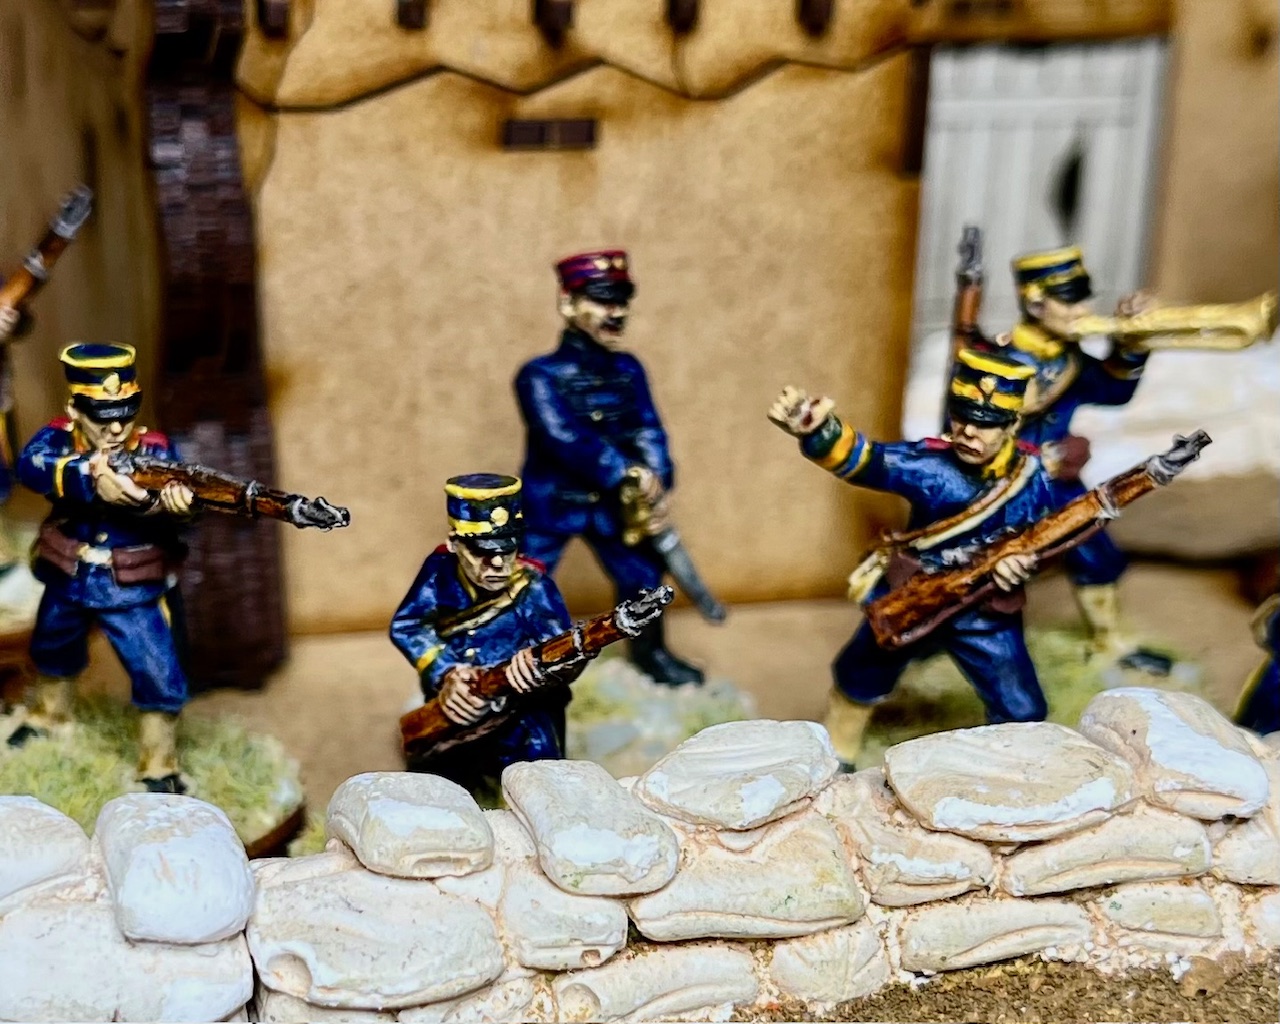
Whenever I start a new period or unit, I make sure I put how I painted the unit into my journal. Before I purchase figures, I first do my research and kinda/sorta figure out how I want the unit to look - then I purchase figures! As I started my Boxer Rebellion project, I decided to use the new Imperial Japanese Infantry from Crusader Miniatures. Always prime your figures as paint sticks to paint. Whether you use white, black, pink is up to you. If you use contrast type paints you will need to prime in white or light grey. For these figures I used Citadel Bone Wraith (not as dangerous as a Banshee) Grey for my primer.

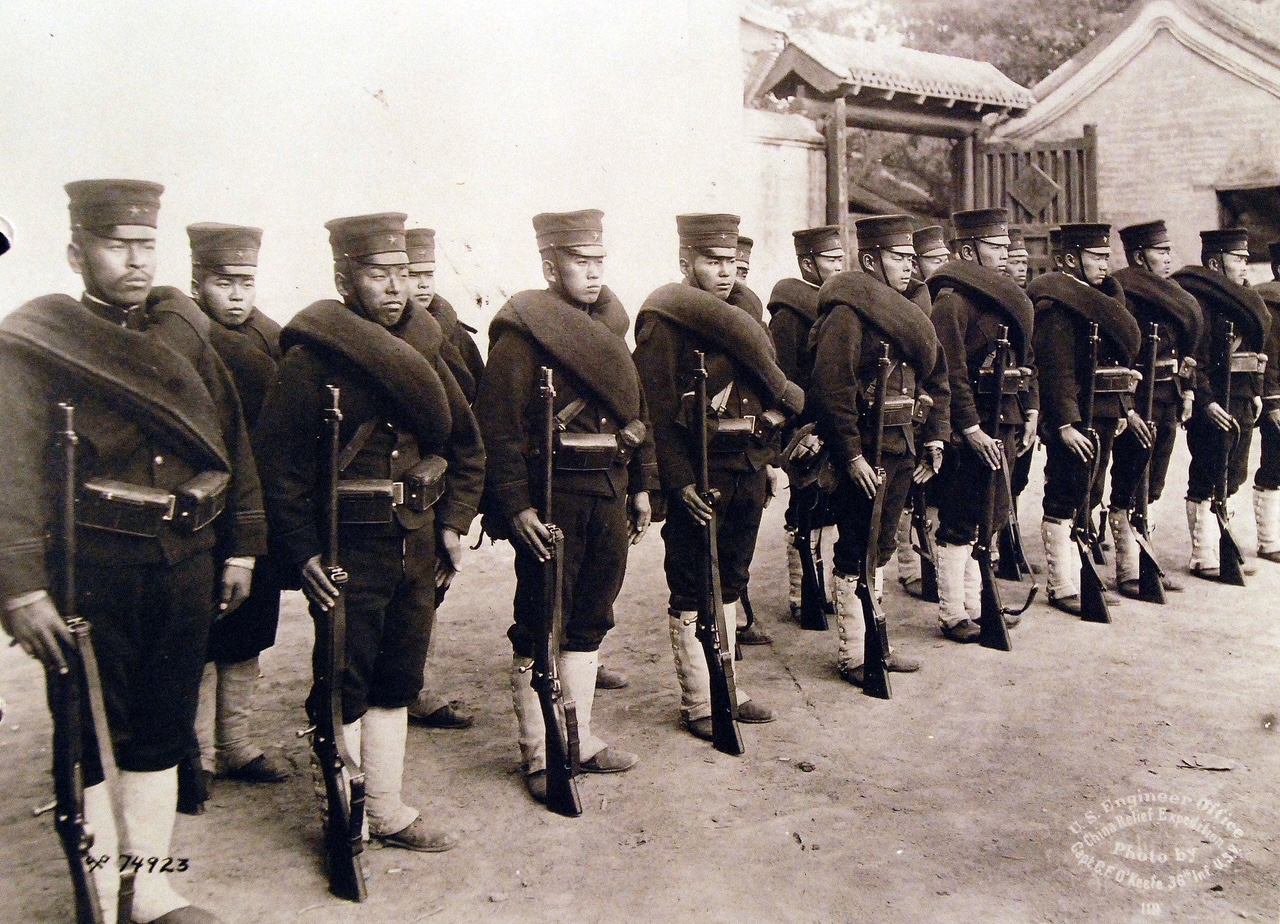
Photograph of Japanese Infantry, Chinese Relief Expedition, 1900. Photograph by Captain C.F. O’Keefe, via National Archives, U.S. Naval Historical Command, and Library of Congress.

1. I started with a coat of Citadel Contrast (CC) Darkoath (BWAH HAH HAH!) Flesh and then painted the garters with CC Skeleton (no bones about it) Horde.

2. Let's talk about painting Japanese uniforms with the Infantry yellow branch color.

CC Darkoath (BWAH HAH HAH) Flesh, CC Skeleton (no bones about it) on the gaiters and CC Ultramarine (For the Emperor!) Blue on the cap.

3. The Japanese uniform was heavily influenced by the German Army at that time. For that color, I usually do a base of Vallejo Prussian Blue with highlights of Vallejo Dark Blue. I compared that with doing a heavy coat of Contrast Ultramarine (For the Emperor!) Blue and found I got almost the exact color for the uniform. I decided to go the speedy way and used Contrast Ultramarine (For the Emperor!) Blue. When I paint I like to do all of the same colors of a figure at the same time. Fortunately . . . I had painted a test figure and decided to do the cap as a separate step due to leaving where the Infantry branch color of yellow would go due to the challenges of painting yellow. The cap is the most challenging part with the yellow branch colors on dark blue.

4. I highlighted the skin with Vallejo Dark Flesh.


5. Now it is time to paint the uniform jacket and pants CC Ultramarine (For the Emperor!) Blue. Optionally you can paint the jacket, pants and cap - or just the pants - however you like to paint white on figures. Here is an reenactor wearing the white summer uniform.


Japanese ranker painted with Contrast Ultramarine (For the Emperor!) Blue. Skin has been highlighted on the "high points" with Vallejo Dark Flesh.

Imperial Japanese Infantry NCO, circa 1895 to 1905 painted with Vallejo Prussian Blue and then highlighted with Vallejo Dark Blue.

6. I went back and painted or cleaned up any areas that would have yellow with white; the collar, the trim on the cap and the trouser pants.
 

7. It's yellow time. For yellow on figures I use various paints depending on the look I want the figure I want to have. I have had great success using Vallejo Yellow Ochre, Vallejo Flat Yellow and Citadel Sunburst Yellow. I wanted to try CC Iyanden (a planet in Star Wars?) Yellow since I was primarily using contrast paints for this unit. It looks okay . . . on some of the figures there was a reddish hue (note the standard bearer in the background of the photo below) and I later cleaned those up with Vallejo Flat Yellow.


The cap and the trouser stripe look great, but the excess paint on the collar looks reddish - I later fixed that with Vallejo Flat Yellow.

8. I'm not going to bore you with each step I did with the rest of the colors of the various parts of the figures. Most of us have our own preferred order for painting; I like to start with the faces and some of the best figures I have seen are painted with the faces last. They're your figures and we all have a way we like to do them. Anyway . . . here are the colors I used to complete the figures:

Cap straps, visors, bayonet scabbard and hair: Vallejo Flat Black.
Haversack and strap: CC Skeleton (no bones about it) Horde.
Metal: CC Basilicum (German for Basil) Grey.
Rifle, Canteen and strap: CC Gore Grunta (I don't even want to ask) Fur.
Straps, ammo pouches and rifle sling: Vallejo Mahogany Brown.
Bayonet: Vallejo Silver.
Boots: CC Templar (and we know what happened to them!) Black.
Epaulets: Vallejo Flat Red.

To replicate the Imperial Star on the cap, which unfortunately is not sculpted on the Crusader figures, I did a black dot with Vallejo Flat Black and then a dot of Vallejo Shiny Gold on top of that.

Tah Dah!


Friday, June 20, 2025

The Boxer Rebellion Project, Part 4: Imperial Japanese Infantry from Crusader Miniatures


 I love these figures. Not only can you use them for the Boxer Rebellion, they are appropriate for the First Sino-Japanese War 1894-1895 and also for the Russo-Japanese War 1904 - 1905. 

The Infantry yellow branch color shows up very, very dark in old photographs.

Essentially the figures are wearing the M1886 dark blue uniform that was heavily influenced by the German Army. My only real complaint is that the national star badge is not sculpted on the caps; but, at the 28mm scale, this can be easily replicated with a spot of Flat Black paint and them a spot of Shiny Gold. 

Historical reenactor of Japanese Infantry circa 1900.


During this period, both rankers and NCOs were also issued a white lightweight uniform for use in hot weather and in this scale, it is almost entirely the same uniform as the dark blue and is appropriate for both the First Sino-Japanese War and the Boxer Rebellion. In fact, it was not uncommon for a mix and match of both winter and summer uniforms.

Japanese soldiers wearing the winter cap and jacket and the white, light weight trousers. The Infantry branch color of yellow appears as black in older photographs.

For my first infantry unit For The Men Who Would be Kings they are Crusader Miniatures packs BJA001 - Japanese Infantry firing/loadingBJA002 - Japanese Infantry Advancing, and BJA005 - Japanese Infantry Command. I decided not to get the figures in full kit; why? Because I'm lazy and I wanted to get them painted quickly (BWAH HAH HAH - wait until you see my painting guide!). 

BJA001 - Japanese Infantry firing/loading.


BJA002 - Japanese Infantry Advancing


BJA005 - Japanese Infantry Command; yep, still need a flag.


Each pack comes with 4 figures so that in my 12 figure unit each figure is unique. I painted the officer as Lieutenant Colonel Shiba Gorō, the military attaché in the Japanese Legation. He was an artillery officer in the Imperial Guard and wears the red piping appropriate for his branch and the guard. I still need to get some Japanese battle flags and I'm going to use the Japanese flag poles from Tsuba Miniatures pack RJ-J08.


Speaking of the Japanese troops in the Legation, virtually every photograph I have seen show them in the dark blue cap, jacket, but white summer pants with white leggings. Basically, you can pick whichever combination of uniforms you want to identify your separate units and easily defeat any uniform Nazi out there! 

"On to Peking!"

Friday, May 30, 2025

The Colonel's Recovery Repeats: Late German World War II Forces in 15mm

I'm officially a cranky old man with a cane with 6 weeks to go until full recovery. The good news is that I have started painting again per the PLAN! BWAH HAH HAH HAH HAH Agghh *cough, cough*. Okay, enough of that. 

I have always been amazed at the versatility of Battlefronts' 15mm line of WWII vehicles and figures. The detail is amazing and the parts and figures add to the possibility of endless conversions. None of the vehicles were painted with an air brush and about 95% of the paints used are Vallejo with some Citadel colors. All of the figures and vehicles below are based on actual photographs (some rare color pictures) from the war. Original published on April 16, 2024. 

The Panzerkampfwagen VI please don't ask me which version); the infamous Tiger Tank.

While I am finishing up some projects that I am not quite ready to post yet, I thought I would share some of my favorite photos from my Late War German World War II force.

Panzergrenadier Executive Officer.

10.5 cm Artillery Battery

Fire Direction Center with Communications truck.

Gun Teams.

One of the rare Mounted Panzer Grenadier Companies on the Western Front, 1944.


Thursday, April 10, 2025

Ogre: The Ogre Mark V


In the year 2085, armored warfare is faster and deadlier than ever. Hovercraft, tanks, and infantry slug it out with tactical nukes. But, the most feared weapon of all needs no human guidance. It's a giant cybernetic tank bristling with guns and missiles.

It's the Ogre.


A part of the sturdy, cardboard game board. You can also play without the board and use a ruler.

Ogre has always been one of my favorite games and one of the first games I purchased myself as a you 12 something. The updated board game version is fantastic and Honorable Son #3 (The Chemical Engineer Aviator) has plastic miniatures to play on the new board game. He asked me if I would paint them (it didn't take long to twist my arm) so I thought I would use just three GW Contrast paints to knock them out quickly.


Above is the sprue for the MK V Ogre in hard plastic. In order to use GW Contrast paints the items must be primed in either white or a light gray. I did not use Hobby Primers, even though they are usually the best quality primer out there - I just buy whatever is on sale.


You can see that some of the red can still be seen after one coat of primer. I almost gave it a second coat but I thought to my self, "Self, this is an Ogre. It's not some fancy parade ground museum piece. It needs to look rough around the edges." In addition, I was painting it white so I figured - who cares?


I did some rushing in gluing the Ogre together with the treads. I should have glued one side, let it dry, and then glue the other side. You can see the results of where my sticky fingers were as I put treads back into the correct positions. Hey, it's battle damage. The model itself is easy to put together if you take your time.


I used GW Contrast Blood Angel Red for the base color of the hull. Truth in advertising time: I did not paint the whole hull at one time due to the length of the model. Contrast paints take about 20 minutes to dry and I did not want my finger prints (see above on gluing treads!) on any of the areas. The main batteries, in fact all of the batteries are painted with Contrast Basilicanum (What the heck is a Basilicanum in the GW world? Gee, another homework assignment.) Black and the Primary Sensor Array is painted with Contrast Nazdreg (BWAH HAH HAH!) Yellow.


The engine like structures, exhaust fans, and treads were all painted with GW Contrast Black.


The rest of the secondary batteries, anti-personnel batteries and secondary sensor arrays were also all painted Contrast Basilicanum Black. The Rattler Missiles were painted with Contrast Nazdreg Yellow.


Tah Dah! All done.


BWAH HAH HAH!