As an Amazon Associate I earn from qualifying purchases

Showing posts with label Hobby Talk. Show all posts

Friday, April 14, 2023

Photo Editing during the LONG MOVE

"It's been quiet since November Colonel Sahib . . . too quiet."

I have been transitioning to my new location and needless to say, with moving the household, I have not been painting or gaming. On the gripping hand, I have been playing with photo editing techniques with my Iphone 13.

Editing for a dramatic look!

 Here is the original picture from the photo above:


The biggest mistake I have made as I was experimenting is not keeping track of the editing I did with each photo though I have general ideas of what I have used. Oh well. A lesson learned for the future. Here are some more examples with the original first followed by an edited version.

10th Bengal Lancers.


It is amazing the differences you can make with some simple cropping, filters, changing of exposure, black point, shadows, etc.; all with some easy to use controls on the phone.

Guarding the gate.


The Meeting of the Minds.


The Last of the Mohicans.


A Lost World.


A Pulp Adventure.


In a galaxy a long time ago and far, far away . . .

Anyway, that's how I've been entertaining myself during the move. It won't be long and I'll be up and running again with more painting, figures, battles and adventures galore! So be prepared for the Eastern Frontier of America, the Northwest Frontier of India, some Pulp Action and a return to Science Fiction gaming.

"What was that sound?"

Friday, May 6, 2022

British Riflemen in Skirmish Order from WoFun Games Peninsular Starter Pack

A company from the 5th Battalion/60th Rifles.

I enjoy playing with Toy Soldiers and I love the hobby; having said that, remember at the end of the day we are playing with Toy Soldiers.

When I posted my recent purchases on several popular miniature gaming boards, I was surprised by several reactions on one board:

Of course this allows people to afford to wargame and bring more people to the hobby, which are good reasons but:

1. Nice idea but their research is a bit sketchy; white facings?

2. The colours are in the wrong positions for honour. (Referring to British line infantry battalions)

3. OK! It just makes one wonder why wargamers, even those just starting in the hobby bother with tomes of historical battles, uniform research, sable brushes, paint etc. Oh! And in some cases, conversion, to painstakingly strive for uniform accuracy of each individual figure. The Napoleonic uniform was one of the top reasons for drawing me to the hobby. I wonder what drew others?

The original photograph that caused the "controversy".

As a retired Colonel of Infantry of the US Army, Military Historian, and semi-mature adult, I wisely (in my opinion) did not decide to respond and go down those rabbit holes. I only made one response to the last comment:

"Maybe the fun, the social activity and the fun of gaming?"


Anyway . . . in my experience yes the uniform regulations say one thing, but the reality? Heck, even during my service in the "modern" era, I didn't always wear what the regulations said (where did that British scarf and German fur line boats come from anyway?).  Basically, it's just how you want your armies to look, parade ground or what they looked like in the field. Even today, modern dyes fade and there were color variations. In the late 18th Century and early 19th Century, it was even worse - and I won't even discuss the issue of resupply!


My preference for most of my armies is for them to look like what they would look like in the field at gaming distance. I'll be the first to admit though, my Grenadiers of the Imperial Guard look like they just came off the parade field because they are the Grenadiers of the Imperial Guard. It's your army!


They way I looked at the British rifle figures with white facings, grey trousers and white trousers is that you can make them whatever unit you want. They can be the 95th Rifles, the Light Infantry of the King's German Legion (KGL) or the 5/60th rifles with just a little work. I decided to paint the facings red to make them a unit from the 5th Battalion, 60th Rifles. Now the "regulations" have them wearing grey trousers and some of my riflemen have green trousers. Why? Because that's all I had! As for the "white" trousers at gaming distance to me they are faded grey with variations of the Iberian Peninsula shining on them from different angles.


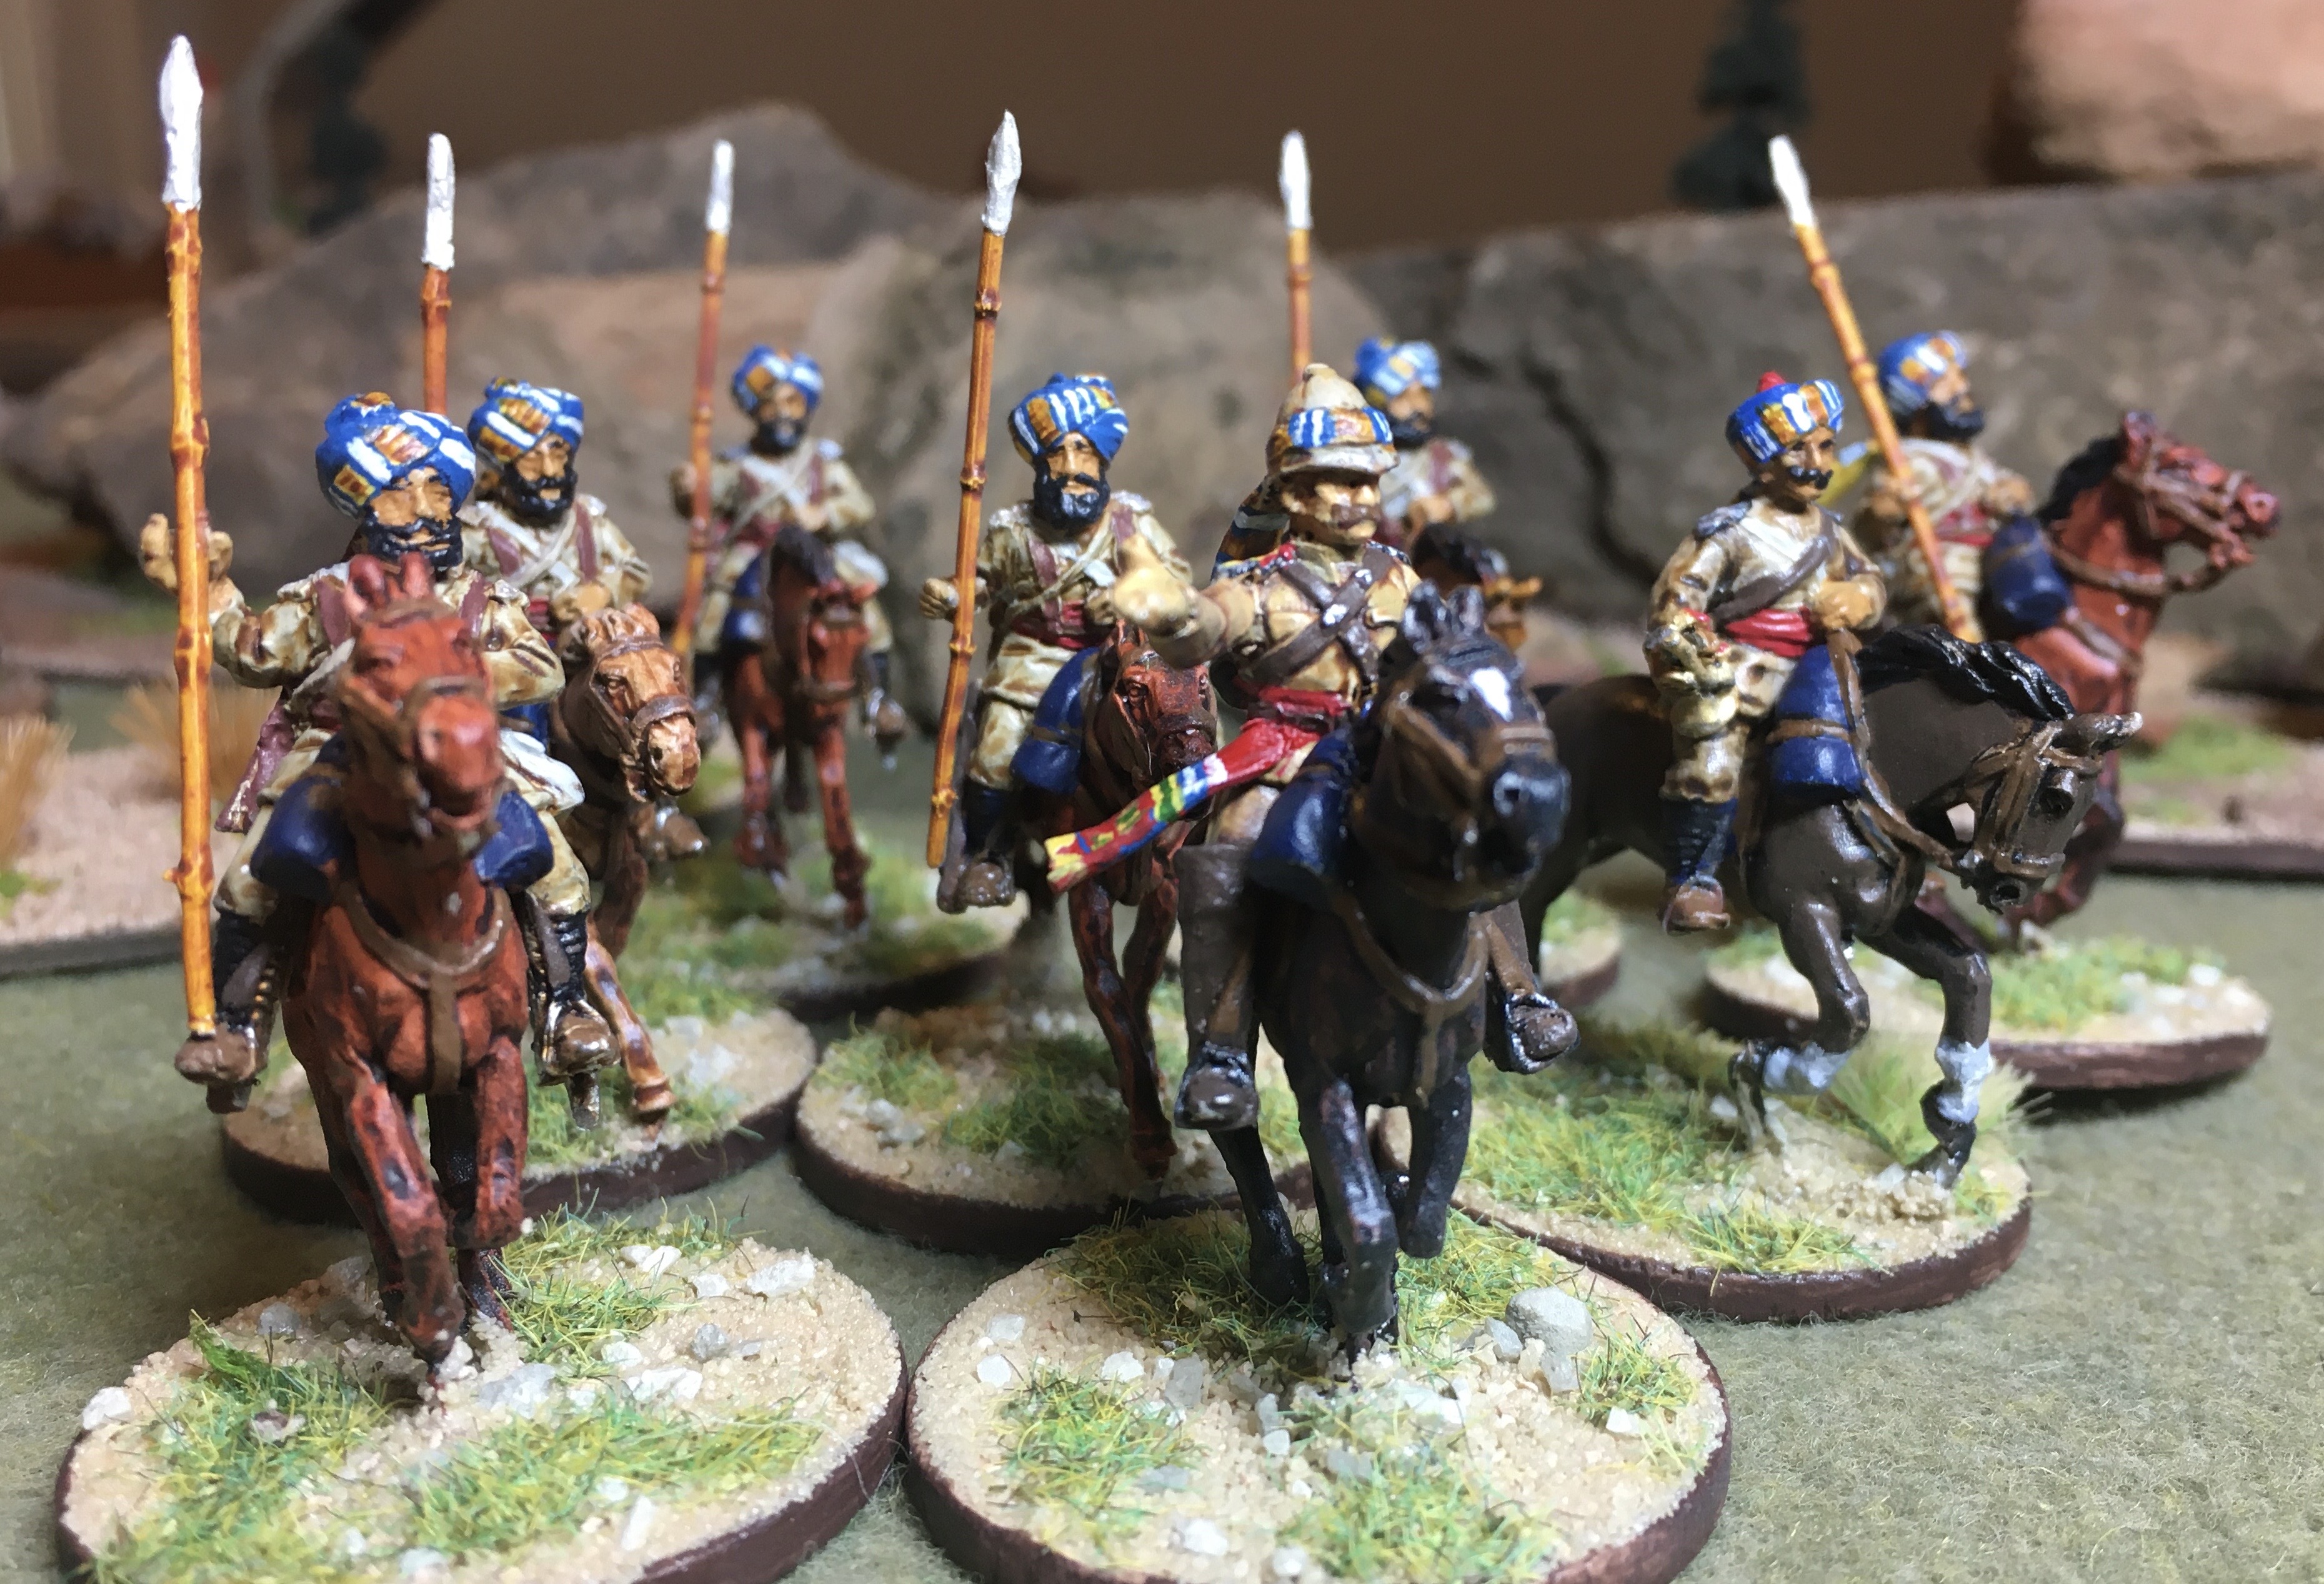
Sure many of us like to do meticulous research and want our units to look just right. I'm doing the same thing know as I am getting ready to paint some Indian Service Troops and Highlanders for the Northwest Frontier Uprising of 1897 to1898. But don't ruin the hobby for others just because the buttons should be faded brass instead of shiny gold.


The completed unit.

"We all have our time machines, don't we. Those that take us back are memories...And those that carry us forward, are dreams." H. G. Wells.

Tuesday, September 7, 2021

More Inexpensive Rocky Terrain


As a gamer on a budget (who isn't?) I like to save money with my hobby whenever I can. This year I have really been focusing on making terrain for my tabletop as my two new periods are the British Raj and the French and Indian War. Coincidentally, the rules I am using are both from the talented Dan Mersey, The Men Who Would be Kings, and Rebels and Patriots from Osprey Games. Since both rulesets are "large" skirmish games, terrain plays and important part. In addition, one of the major of appeals for me in miniature wargaming is the aesthetics of the table top. So lets make some more rocky terrain to break up formations and to hide behind for excellent cover.


First step for me is to find some real rocks! One of my past times (and how I get my exercise) is walking in the woods of the Southern United States. When I was working this project, over a period of days, I found some interesting rocks to use. I know what some of you are thinking: "Aren't that heavy and require storage space?" Well, they are really not that heavy, and now that my children are grown, I have plenty of storage space.


Hobby Lobby is a store in the United States and for US $5.99 I bought a pack of six, 6 inch diameter round craft plywood pieces. I use gobs of white glue to glue the rocks to the wood; but, before I do, I position the rocks with figures to make sure that are positioned correctly to use on the tabletop battlefield. Pictured above is a 28mm figure from Perry Miniatures mounted on a 25mm mdf stand from Litko Game Accessories.


The rocks are glued in place and left to dry overnight. You may notice that four of the bases have painted brown borders and two of them don't. Yep, I started applying glue and rocks and suddenly realized that I forgotten to paint the edges after I did two. I highly recommend painting the edges first! It can be challenging (yes it can) painting them with the rocks already on the bases. The base edges were painted with inexpensive (US $2.99) Burnt Umber craft paint.


I use Railroad hobby ballast for my basing needs as it is less expensive than buying hobby sand that is marketed for miniature gaming. I use gobs of glue and water it down to affix the sand. Since these bases are considerably larger than my figure stands, I used a large plastic container to put the sand in so I could easily dip the bases into the sand. Don't worry if you miss a few spots - that can easily be filled in with static grass. Make sure the sand is fully dry before moving onto the next step.


Once the sand is fully dry, pour some more white glue over the sand and use and old brush to water it down and spread it out evenly over the sand. When dry, it acts as a sealant and gives extra protection to your sand to it won't fall off.

Save those old, worn out brushes for jobs like this.


Remember that Burnt Umber craft paint. Once the coating of watered down glue is dry, I water down the Burnt Umber and spread it over the sand to let it seep in. I've gotten lazy highlighting my terrain and this is a quick, and I think looks good, alternative.


After the paint dries, I randomly put some white glue on the bases and water it down with that same old brush. Then I add some static grass and let it dry.


I added static grass on this rock as there was some white glue that spilled on the rock, dried and was noticeable. The stain around the grass is just watered down glue drying.


Ta Dah! All done. I'm am by no means a modeling expert and I find this technique quick and easy to do. I failed to mention that I used photographic references of the areas I'm gaming to help me with the positioning and modeling of the terrain.


As you can see, the rocky terrain works for a multiple of genres. One last look at some of the rocky terrain I have built this year.