As an Amazon Associate I earn from qualifying purchases

Monday, July 17, 2023

More Inexpensive Rocky Terrain


As a gamer on a budget (who isn't?) I like to save money with my hobby whenever I can. This year I have really been focusing on making terrain for my tabletop as my two new periods are the British Raj and the French and Indian War. Coincidentally, the rules I am using are both from the talented Dan Mersey, The Men Who Would be Kingsand Rebels and Patriots from Osprey Games. Since both rulesets are "large" skirmish games, terrain plays and important part. In addition, one of the major of appeals for me in miniature wargaming is the aesthetics of the table top. So lets make some more rocky terrain to break up formations and to hide behind for excellent cover.


First step for me is to find some real rocks! One of my past times (and how I get my exercise) is walking in the woods of the Southern United States. When I was working this project, over a period of days, I found some interesting rocks to use. I know what some of you are thinking: "Aren't that heavy and require storage space?" Well, they are really not that heavy, and now that my children are grown, I have plenty of storage space.


Hobby Lobby is a store in the United States and for US $5.99 I bought a pack of six, 6 inch diameter round craft plywood pieces. I use gobs of white glue to glue the rocks to the wood; but, before I do, I position the rocks with figures to make sure that are positioned correctly to use on the tabletop battlefield. Pictured above is a 28mm figure from Perry Miniatures mounted on a 25mm mdf stand from Litko Game Accessories.


The rocks are glued in place and left to dry overnight. You may notice that four of the bases have painted brown borders and two of them don't. Yep, I started applying glue and rocks and suddenly realized that I forgotten to paint the edges after I did two. I highly recommend painting the edges first! It can be challenging (yes it can) painting them with the rocks already on the bases. The base edges were painted with inexpensive (US $2.99) Burnt Umber craft paint.


I use Railroad hobby ballast for my basing needs as it is less expensive than buying hobby sand that is marketed for miniature gaming. I use gobs of glue and water it down to affix the sand. Since these bases are considerably larger than my figure stands, I used a large plastic container to put the sand in so I could easily dip the bases into the sand. Don't worry if you miss a few spots - that can easily be filled in with static grass. Make sure the sand is fully dry before moving onto the next step.


Once the sand is fully dry, pour some more white glue over the sand and use and old brush to water it down and spread it out evenly over the sand. When dry, it acts as a sealant and gives extra protection to your sand to it won't fall off.

Save those old, worn out brushes for jobs like this.


Remember that Burnt Umber craft paint. Once the coating of watered down glue is dry, I water down the Burnt Umber and spread it over the sand to let it seep in. I've gotten lazy highlighting my terrain and this is a quick, and I think looks good, alternative.


After the paint dries, I randomly put some white glue on the bases and water it down with that same old brush. Then I add some static grass and let it dry.


I added static grass on this rock as there was some white glue that spilled on the rock, dried and was noticeable. The stain around the grass is just watered down glue drying.


Ta Dah! All done. I'm am by no means a modeling expert and I find this technique quick and easy to do. I failed to mention that I used photographic references of the areas I'm gaming to help me with the positioning and modeling of the terrain.


As you can see, the rocky terrain works for a multiple of genres. One last look at some of the rocky terrain I have built this year.

Thursday, July 13, 2023

My (Semi) Historical Late 19th Century Indian Army (Part Four)


"True to his salt."


The Corps of Guides was raised at Peshawar on 14 December 1846 by Lieutenant Harry Burnett Lumsden on the orders of Sir Henry Lawrence, the British Resident at Lahore, capital of the Sikh Empire. Initially composed of a troop of cavalry and two companies of infantry mounted on camels, the Guides were organized as a highly mobile force. The corps was ordered to recruit: 

" . . . trustworthy men, who could, at a moment's notice, act as guides to troops in the field; men capable, too, of collecting trustworthy intelligence beyond, as well as within, our borders; and, in addition to all this, men, ready to give and take hard blows, whether on the frontier or in a wider field."


The Queens Own Guides, Infantry, Punjab Frontier Force was my next infantry addition to my British Indian Army that I game using the rules The Men Who Would be Kings. The figures are all by Artizan Designs and this unit was the first unit that I tried to use mostly Games Workshops Contrast Paints. Contrast Paints are not for everyone; you have to paint faster than I am used to doing. Also, the recommended time for drying is 30 minutes before using another color.


There are many tutorials on YouTube and I have discovered, within reason (mine that is) that there are some advantages to using Contrast Paints when you are used to a different style of painting.  In addition, the Contrast Paints cost more and I noticed that you tend to use quite a lot! Still, I am happy with the results for my Guides. The Guides were perfect as they are primarily khaki with various browns. Here are the paints I used:

Uniform and Pagri (turban): Contrast Skeleton Horde (BWAH HAH HAH!).
Kulla (the pointed skull cap): Vallejo Flat Red. I painted the tip Vallejo Gold for the tip to denote the officers.
Poshteen: Contrast Nazdreg Yellow.
Fur Trim on Poshteen and boots:  Contrast Cygor Brown.
Skin: Contrast Snake Bite Leather. By varying the amount of the paint on the brush you can make the skin lighter or darker.
WebbingContrast Gore Grunta Fur. I have recently discovered that a Gore Grunta is a large Ork War Boar.
Haversack and Puttees: I painted Vallejo Ochre Green over the Contrast Skeleton Horde  (BWAH HAH HAH!).
Rifle: Wood Vallejo Mahogany Brown. The metal parts are Vallejo Gun Metal dry brushed with Vallejo Silver.
Bayonet Scabbard and Hair: Contrast Chaos Black.

Jemadar (Captain). Note the gold tip on his red kulla which denotes commissioned rank. He would also have his rank insignia on his shoulder epaulets but these are hidden by the poshteen.


Next unit up for my Indian Army for The Men Who Would be Kings is the 20th (Duke of Cambridge's Own) (Punjab) Regiment of Bengal Native Infantry with all figures from Artizan Designs (UK/EU link and US Link). I feel I have my "speed painting" method down using GW Skeleton Horde Contrast for the khaki uniforms. As you can see above, for this unit I went with the alternative basing of "3", "2", "1". Of course they can be used for other popular Colonial rules.

One of my favorite figures from the Artizan Designs 2nd Afghan War range.

There were two reasons I choose to paint this unit: (1) They played a significant role during the Frontier Uprisings of '97 - '98 and (2) they have green kullas on their turbans to add color to the waves of khaki.


After my first game of The Men Who Would be Kings, it became apparent to me that it was time to paint the Indian Army Maxim Gun based on the devastating performance of the Imperial Russian machine gun. Not only did the Russian Maxim perform historically, it was extremely effective due to its high rate of fire of causing casualties amongst infantry that had cover bonuses from Hard Terrain. Yikes! I decided to paint them as a detachment from the 20th Punjabis.

"Whatever happens, we have got The Maxim gun, and they have not." - Hilaire Belloc in the words of the figure "Blood" in his poem "The Modern Traveler".


My Indian Army Maxim machine gun is another blister pack from Copplestone Castings' Back of Beyond Range. In fact, the pack comes with two machine guns: one Sikh and one Indian Muslim. When purchasing, since I live in the USA, my go to for Copplestone is either eBay or Brigade Miniatures (no Lon Weiss did not pay me to write that!). If you are in the States, Brigade Miniatures has inexpensive and fast shipping - I highly recommend the store.


That's my Indian Army for now. In the future I plan to add the Gordon Highlanders, a Sikh unit, a Ghurka unit, a regular British Infantry unit and some Mountain Artillery.

Monday, July 10, 2023

My (Semi) Historical Late 19th Century Indian Army (Part Three)

"I say. Get on with the typing. Jolly good. Quite."

As I decided to focus my Indian Army during the period of the 2nd Afghan War and 1900 using the rules The Men Who Would be Kings, I started doing some research on units, uniforms, etc. I'm a Military Historian (hmmm, where did I put that framed diploma?) but I am not a serious stickler for 100% in how my troops look. In fact, also as a retired Infantry Colonel, I can tell you from experience, what is in the regulations is not necessarily followed by all in the field. It still cracks me up when I first saw a uniform guide for Desert Storm with the soldiers of the US VII Corps, particularly the 1st (US) Armor Division in the "Chocolate Chip" desert uniforms. Well . . . we were issued them after hostilities. 

In the scales I play, I go for gaming distance in how my figures look on the tabletop. Close enough is good enough for me. Enough of an editorial. I choose the next unit to paint because I think there is a rule that you must have at least one Bengal Lancer unit in your Army.

The 10th (The Duke of Cambridge's) Bengal Lancers (Hodson's Horse).

Before I started to paint the 10th Bengal Lancers, which are all Perry Miniatures, I decided I was going to experiment first using GW's Contrast paints to see if they were a viable option for painting the figures. What I refer to as "The Great Indian Army GW Contrast Paint Field Study" was an outstanding success and worth the requisition from the Ministry of Finance. The entire Study is on the link above.


I decided to paint my Squadron of the 10th Bengal Lancers as they would have looked during the Frontier Uprisings of 1897 to 1898. They carry no pennants on their bamboo lances as they are on active field duty against the enemy. The 10th also had black puttees while most cavalry units had blue. I also added trailing scarfs from the Perry Miniatures Afghan Tribal Infantry box to their pagari (turbans). Hey, if you are going to have Bengal Lancers, they need to look dashing! I also attached one of the trailing scarfs to the cummerbund of my dapper British officer.

"Save those bits!"

If we are going to be in India, we must have some Kipling! One of the greatest English novels of all time is Kim, written by Nobel Laureate Rudyard Kipling. For my army, I decided to do some characters from the novel. You can view my suggested rules by just following the links. All of the figures are conversions primarily using the Perry Miniatures Afghan Tribal Infantry, a D&D figure from the Nolzur line from WizKids and my handy dandy bits box.


In addition, again doing a conversion from the Perry Miniatures Afghan Tribal Infantry box I did a real life Political Officer: Colonel Sir Robert Warburton, KCIE, CSI.


Next:

1. "How about some Infantry?"
2. "How about some fire support?"
3. "Colors? We don't need no stinking fancy colors!"


Thursday, July 6, 2023

How do you Paint those Turbans?


Whenever I paint a new period or a new type of figure (in this case both!), I usually paint a test figure to work out the colors and how I want the unit to look. Since I was working on a Sikh cavalry squadron of the 3rd Regiment of Bombay Light Cavalry for The Men Who Would be Kings. I thought to myself, "Self, while you document the colors in your handy dandy notebook, why not use the camera on your phone to capture the steps of how you painted the figure?" At the time I was doing this, I was also working on a unit of French Marines for the French and Indian War, so that allowed the paint to dry before moving on to the next step.


For the unit I am painting I purchased two packs of Artizan Designs NW0110 Sikh Cavalry and one pack of NWF0109 Sikh Cavalry Command. They can be purchased in the United States at Brigade Games or direct from Artizan Designs in the UK. Above is a figure from pack NW0110. I don't know if it is me, but lately it appears that the 2nd Afghan Range from Artizan has more flash, mold lines and pock marks than they used to. I don't know if there is an issue with the molds or the casting process (and they are good figures!) but it took a lot of filing and prep time to get figures and horses ready for painting.


I have only a few simple cardinal rules for myself when I paint and what I pass on to others. One of them is ALWAYS USE A PRIMER! I won't get into the debate on which color primer is the best, but paint sticks to paint. Most of the time I use black primer because black can hide a multitude of painting sins - but I also use white, brown and grey. The black primer I use is just US $1.19 a can - you don't need the fancy hobby store primer if you want to save money.

Here are my rules when I paint a figure:

1. Always use a primer.
2. Paint the figure for gaming distance; i.e., what will the figure look like at a distance while you are gaming? My eyes are getting older and this works perfectly fine for me - every figure does not need to be a miniature work of art.
3. It's your army. You bought it. Paint it how you want. If you want to use 3 color blending that's cool; if you just want to use one color with no shading that's fine too. Paint to your comfort level. To be honest, sometimes I'm lazy and sometimes I want to do it fast and that determines often how I paint.
4. If you make a mistake, don't worry about it - just paint it over.


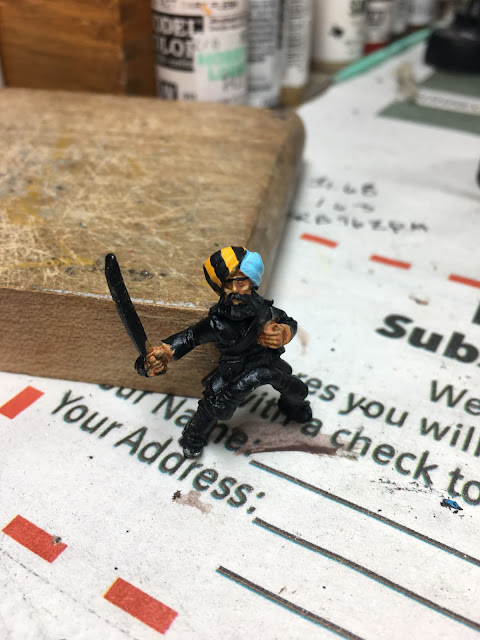
I like to paint the face first and I always look at photographs of what people look like. Fortunately I have a friend who is Sikh - but I promised I wouldn't say his name! He laughs when I call him my male model but he doesn't want his name out. All paints are Vallejo unless otherwise noted. For the base of the skin I used Dark Flesh.


Next I used a slightly watered down GW Ratskin Flesh (or whatever they are calling the color now. It's the one that used to be Dwarf Flesh but I can't keep up with the names anymore)>


Next I made my own wash of watered down Dark Brown.


I then went back and highlighted the high points of the face and other parts of the skin with Dark Flesh again. I probably spend more time on the faces than other parts of the figure because for me, it sets the tone and "personality" of the figure as I paint. I usually don't do eyes these days and just let the shading do the trick (Gaming Distance).


One of the challenges I have with cavalry is do I glue the figure to the horse and paint them together or do I paint them separately or glue the figure on the horse later in the process? This time I waited to glue the figure later since I had a turban with stripes to paint and I think it would have been harder to paint if he was glued to the horse. I used GW Golden Yellow or whatever GW calls it now (which is actually darker than the picture) with two coats on one side and Sky Blue on the other. I discovered by accident that Sky Blue is an excellent base color to use for dark colors that you don't want to look to dark; e.g. Dark Green looking black at gaming distance.


Make some black vertical stripes wide enough to allow two stripes inside the black later on. I used Flat Black for this. Don't worry if it isn't perfect; you can always paint over if you are off a little or remember, it doesn't look perfect in the field.


Here is the side. The figure is not glued to the horse; I'm just using the horse as a stand to allow the figure to dry.


I have no idea what the back of a turban looks like as all the pictures are always from the front. So this is what mine looks like.


I'm showing the turban a lot from different angles because it is the turban that is going to draw the eye to the figure/unit when gaming.


One more view of the steely eyed cavalryman charging right at you!


Inside the black parts of the turban, paint Flat White.


Now you can see how I cheat. I painted a smaller vertical stripe inside the white with Dark Blue. Then I went back and painted a Flat White stripe in the middle and one on each side of the Dark Blue. I find this easier than trying to paint dark stripes and white is easier to fix.


See how it now looks?


I used Dark Green over the Sky Blue and you can see already how the Sky Blue is highlighting and making the Dark Green look brighter.


The base I usually use for khaki uniforms is Yellow Ochre. Great for WW II German tanks too.


For the blanket roll and puttees I use, again, a lighter color as a bash - the good ole Dark Blue. I also painted the cummerbund (I now there is another name and I need to look it up) Flat Red. The saddle cloth, which is hard to see in this picture, was painted Luftwaffe Grey. Unfortunately you can see some of the pock marks on the horse in this picture from the casting process and I was out of green stuff to fill holes.


I have now painted the blanket roll and puttees Prussian Blue which is a really dark blue but lightened by the Dark Blue under it. The leather on the figure has been painted Leather Brown and the horse is Flat Brown. The second coat on the uniform is MSP Desert Tan.


I started mixing and matching other browns to break up the monotony of all of the brown. For the horse I made a wash of Chocolate Brown and then highlighted with Flat Brown. The harness is also Flat brown and the metal is Brass except for the bit, stirrups and the spurs which are Silver. I added, every so carefully, some highlights of Flat Green to the Dark Green on the Turban. I left the boots black. I have seen photos of black boots and brown boots, but I thought this figure had enough brown. The figure is still not glued to the horse. The sword is Silver. I also gently added some Light Grey highlights to the beard and mustache and the horses hair. I also used the same color to border the saddle clothe.


And this is why he is not glued to the horse yet. I learned the hard way to have the figure on the horse and then make sure the attachments are where you want them, then glue the figure!


I trimmed off the basket handle off the scabbard since his sword is already drawn. The pouch on the back is Flat Black.


Here is the carbine. You have probably notice that neither the scabbard or the carbine is primed. Dang it! Forgot to do that before I glued them on with super glue. The figure is now glued.


Well . . . I carefully primed the scabbard and carbine. When I painted them, I painted the scabbard and the carbine stock Mahogany Brown and the carbine holder (?) Leather Brown. Time to put it on the base. I use white glue and this is a 40mm round Litko base.


Tah Dah! All done. Some basing material and I think it will serve the British Raj quite nicely.