As an Amazon Associate I earn from qualifying purchases

Sunday, June 9, 2013

Pike Block King's Lifeguard of Foote

I finished the pike stand for the King's Lifeguard of Foote and the first Royalist brigade commander. With the English Civil War(s) infantry regiments I paint the pikes first.  I have found that the pike figures are easier to paint and with the officers and colors, it sets the tone for the whole regiment.  I am using Clarence Harrison's Victory Without Quarter as my rules and the units are element based; foot regiments usually have one pike stand and two musketeer stands to represent the unit.  So here are some pictures.  (After taking the pictures, I noticed I need to use my big, soft brush to wipe the dust off!)


One thing I failed to do was add the drummer that I painted for the Lifeguard.  When I positioned the figures before gluing, I realized that the drummer would not fit on the stand with the "action" I was trying to portray.


Instead, I added one of the extra drums I had from the Infantry command sprue from Warlord games as battlefield debris.  The drummer will "switch" coats as many did during the war and join another unit later.  Now it's time to finish the two musketeer stands.


  I like to come up with names for my Brigade commanders and have painted two so far.  Time for me to pick some names and post them later.


Friday, June 7, 2013

Samuel Jones' Regiment is mustered!

I forgot to mention that Colonel Jones' Greencoats have joined the ranks of Parliament:


The flag is free to download from the excellent site Wargames Designs.  When I do the activation cards for Victory Without Quarter, I'm going to use the downloaded flag images.

Tuesday, June 4, 2013

Quick and Easy ECW Officer Conversion

I've started the King's Lifeguard of Foote and wanted to give them and wanted to give them a unique flag bearer to make the unit stand out.  After perusing the web I saw some good ideas on converting the Warlord plastic figures.  Here is my attempt which I think is working out really well with minimal work:


1. Start with the armored (that's armoured for my Commonwealth friends!) pikeman from the infantry sprue.


2.  Add the "bent at the elbow" arm from the command sprue.

 3.  Add the pistol arm from the command sprue to make him look ready to defend King and Realm.


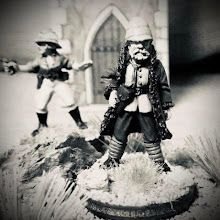
 4. Here is the figure with the basic paint job with some washes applied.  I gave it one of the hats from the command sprue along with one of the officer swords.  The boxed set comes with many extras like feathers to individualize the figures so I gave our young officer some feathers to add an extra dash to his jaunty stance. 


The ensign will be with the pike block which will consist of the figures below with either 6 or 7 figures on the stand.


The armor is flat black dry brushed with GW's Boltgun Metal (I have no idea what the "new" name of the color is).  After drying I went over the armor with a brown wash.


Along with the King's Lifeguard of Foote will be the first Brigade commander for the King's cause from Perry Miniatures.


Friday, May 10, 2013

English Civil War Update

It's amazing how quickly you can paint without stitches in your hand.  I am almost done with Samuel Jones' Regiment of Foot.  All I need to do is finish the bases.

Figures are Warlord Games plastic infantry except for the Wargames Foundry figure next to the flag


Next up will be the King's Lifeguard of Foot.  Why them you ask?  Mainly because they have cool flags. 

 Free downloadable flags from Wargames Design

They are going to be more heavily armored for show so I decided to paint a test figure that is almost finished.  Experimenting with a quick paint style of block painting and washes.  I just need to do the highlights and the figure will be finished.  Based on how quickly this figure went, I think it won't be long until the King's Lifeguard will be mustered in Oxford.

From Warlord's ECW plastic infantry

Next up are two officers; the mounted by Perry Miniatures and the dismounted chap from Wargames Foundry (though I believe sculpted by the Perry's).  The mounted officer will be a brigade commander and I'm thinking that the other officer will command the King's Lifeguard.

I mounted the horse on the base first and did the terrain using a pumice resin mix.  All it needs is some static grass.  I will be taking more time with this figure but decided also to block paint and use washes.  I first primed the figures with watered down Chaos Black from Games Workshop; it was essentially a thick black wash which really helps bring out the detail for painting.


The same technique was used for the dismounted officer and I am really pleased with the results.  I usually take more time to paint the officers and "specialty" figures to make them really stand out.  For the rank and file . . . well, that's the life of the poor enlisted blighters.


Sunday, May 5, 2013

Hedged In

One of the aspects of the hobby I really enjoy is researching and reading about the periods I am gaming.  I enjoy reading about the conflicts, researching flags and uniforms and trying to understand the major themes and personalities.  So it is not surprising that I am brushing up on my knowledge of the English Civil War.  I recently downloaded on my Nook Stuart Reid's All the King's Armies:  A Military History of the English Civil War 1642-1651. 


I've been a fan of Stuart Reid's books for years; well researched, concisely written and for gamers his books are great resources for scenarios, uniforms and loads of fun.  All the King's Armies is no exception.  In fact, in reading the superb descriptions of ECW skirmishes and battles it suddenly dawned on me after reading 144 pages of the 321:  I'm going to need a whole bunch more hedges on the tabletop.  In fact, I'm starting to think that the number one piece of influential terrain during many if not most of these battles is the hedge.  Here is a small sample after doing a word search on my Nook for hedges:

 . . . while the Royalist front line was in the distant hedgerow.  p. 8

 . . . battle began as a firefight along the line of hedge and ditch separating the Marquis of Newcastle's Royalists . . . p. 24

The hedges lining the lane were consequently stuffed full of Royalist dragoons . . . p. 35

Washington and Grey were to be employed in clearing the hedges to their immediate front . . . p. 38

 . . . 200 from Ballard's own regiment -  to line the hedges on the left . . .  p. 43

And on and on and on.  The above is only a small sample and I have checked some other references.  I'm going to need some more hedges.  


 In the background are the 3 hedges I own from Games Workshop
A couple days after I came to this revelation, I was surfing the blogs I follow and came upon a post from Lonely Gamers:  A Wednesday Night - English Civil War.  This is what it should look like - look at those hedges!   And the figures are pretty darn good too!

Time to build or buy hedges before I finish and deploy my troops on the tabletop.