As an Amazon Associate I earn from qualifying purchases

Sunday, November 7, 2021

The Battle of Lament Hill: Part One

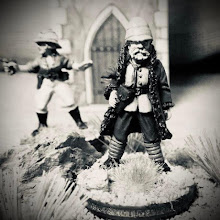
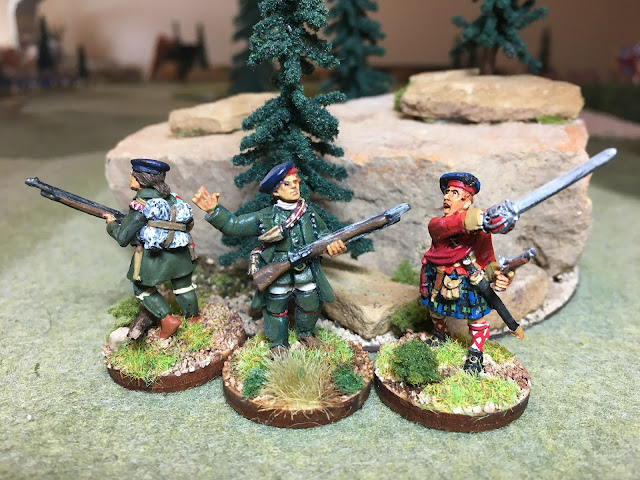
Mohegan Scouts attached to His Majesty's Rangers.

The French have received reports that the British are preparing for an advance to establish a forward supply depot to support the ongoing conflict in North American between the British Empire and their Colonists against New France. The French force, under the command of Lieutenant Charles Deschamps de Boishebert et de Raffetot try to steal a march on the British and plan on getting to the key terrain of Lament Hill to spoil the British plans. The French attack in our first game of Rebels and Patriots (Paid Link).


Turn 1

 Lieutenant Deschamps orders the 1st Company of Marines (which are Light Infantry) to advance to Lament Hill.

The 1st Company easily makes it to slope of the hill . . . 

. . . while the Canadian Milita (Skirmishers who are Sharpshooters) occupy the position vacated by the 1st Company.

The Hurons (a Large, Aggressive Native force) decide the open ground in front of them looks too open with the Rangers on the other side.

The 2nd Marine Company also starts its advance toward Lament Hill.

The French position after their first turn (wow, that hill is looking rough. Time to invest in some new hills!).

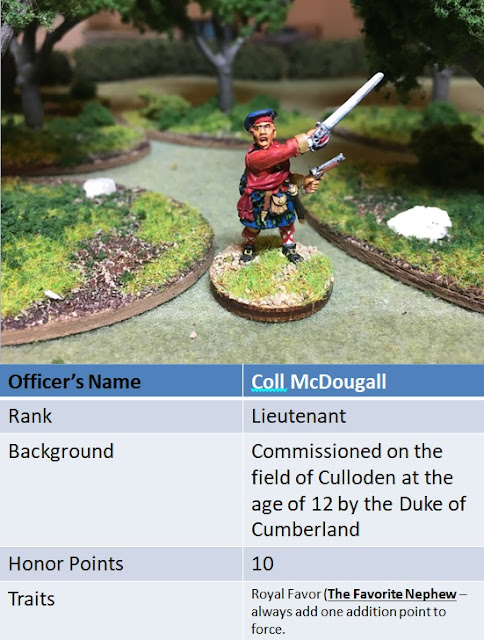
Now the British, under the command of Lieutenant Coll McDougall of the 42nd Highland Regiment make their first moves.

The Rangers (a Small, Aggressive, Veteran Light Infantry unit) are ordered to move - and their activation roll is a 12!

When a double "1" or a "6" is rolled for activation, either something potentially foolish will happen or something potentially heroic. Just to clarify - the double "6" is better. The Rangers roll on the double "6" table and get a 4. This allows them to roll for another activation. The Rangers get to move twice.

We made it to the woods! (Pant, pant.)

My warriors look! The Men in Green have gotten closer to our tomahawks and scalping knives.

The Light Company advances toward the objective while screening the main body of the 42nd.

The Mohegans (Skirmishers) emerge from the woods either to cause trouble on the flanks of the Marine Company heading toward the objective or to occupy the attention of the Canadian Militia.

An overhead shot of the Mohegan and the 42nd Highlander Light Company move.

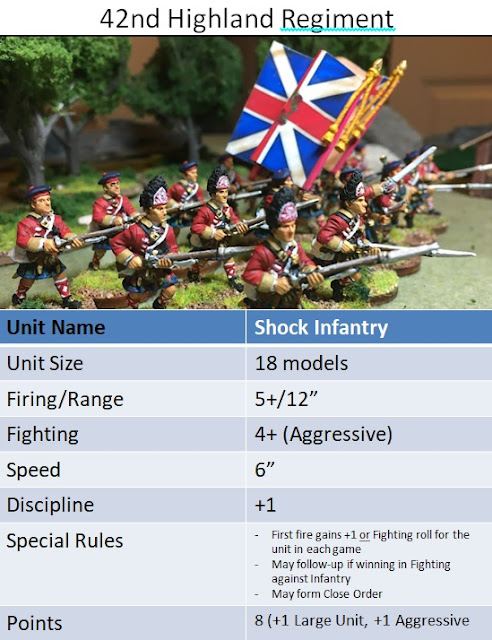
The main body of the 42nd Highland Regiment (Shock Infantry) advances with Lieutenant McDougall and with the Grenadiers in the post of honor on the right.

Well, we made it through Turn 1! (I really need to get some new hills)

Turn 2.

The Canadian Militia, instead of putting their Sharpshooter abilities to work, decide to catch a tan on the big rock instead.

 Lieutenant Deschamps and the 1st Marine Company occupy the objective.

The 2nd Marine Company advances in support keeping an eye on those sneaky Rangers.

"Oh what the heck. Let's advance too!"

And the 42nd rolls a "12"! 

With a die roll of "3" on the Double 6 table, Independent fire commences.  The British get to choose a unit and fire comes from an "off table" unit at long range causing one casualty to the the 1st Marine Company. Fortunately, Lieutenant 
Deschamps is not hit and they pass morale.

The Highlanders get serious as they prepare for the inevitable assault on the objective.

The Light Infantry were ordered to perform a Skirmish Move (move half and then shoot half or shoot half and then shot half) but they fail their activation.

The Rangers fire at long range and hit one figure in Marine Company No. 2. They easily pass their morale check.

The Mohegans perform a Skirmish Move but fail to hit any of the Canadian Militia at long range.

The French have now occupied the objective point for 1 turn without an enemy unit within 3 inches. Whoever occupies for the most turns will earn +3 Honor.

Turn 3.

"Fire at the Highland Light Infantry!"

KAPOW! They got one but they pass morale.

The Canadian Militia decides to join the fight and fires at the Mohegan Natives . . . 

. . . and two of the brave warriors fall to the guns of the Sharpshooters.

The Mohegans also fail morale and receive one disorder marker.

The Huron Warband charges the Rangers; but knowing that the Natives can't reach them, the Rangers decide not to do any reactions to being charged.

The 2nd Marine Company continues to advance.

The situation at the end of the French 3rd Turn.

The 42nd Highlander Light company performs a skirmish move by moving 3 inches and fires at half strength.

Another marine falls; but with the presence of their heroic leader, the unit easily passes morale.

The 42nd Highlanders continue their advance toward the objective in Close Order.

The Rangers roll another 12 as they activate to Fire! And once again a "4" is rolled on the Double 6 allowing them to have another new activation.

The Ranger fire is quite effective taking out three of the Native figures. Now what the Rangers do?

Attack! The Hurons decide to stand, forgetting that as Natives and Aggressive Infantry that they can counterattack.

No quarter is asked or given and the Rangers inflict 3 more casualties and lose one - winning the attack. The Hurons are forced to retreat and take a morale check.

The Hurons fail their morale check and are attacked again who follow-up their victory as Aggressive Infantry.

The Rangers hammer the Hurons again losing none of their own.

Disaster strikes as they really fail their Morale check with an adjusted total of "1" resulting in 2 more disorder markers. With 3 disorder markers, the Hurons immediately are routed and are removed from the game.

The aggressive play by the British using his Rangers has eliminated 25% of the French force in one dramatic and nail biting action!

Meanwhile, the Mohegans fail to rally, add another disorder marker, and retreat to the cover of the woods nearby.

The French have now occupied the objective point for 2 turns without an enemy unit within 3 inches. Whoever occupies for the most turns will earn +3 Honor. Other Honor points for the scenario:

+ 1 Honor if your force managed to cause at least 33% casualties on the enemy.
+2 Honor if your force has taken less than 33% casualties.
Casualties percentages are calculated by the point cost of the units.

Next during the Battle for Lament Hill:

1. Small units seem a good deal for their cost and firepower. Or are they?
2. "I can't believe we forgot that?"
3. The inevitable assault of the 42nd Highlanders.

Till next time, keep your powder dry!

Friday, November 5, 2021

The Battle of Lament Hill: The Introduction

The British Force is spotted by the scouts of the French Army.

As recommended in the rules Rebels and Patriots (Paid Link), we are going to play the first scenario, which is an introductory scenario and we have renamed the Battle of Lament Hill. Lament Hill dominates a critical part of upstate New York which is an ideal invasion route for French forces and their Native allies. The French, based on a die roll, have been designated the attacker and will set up in the Northern zone while the British will be in the South. 

The Battlefield.


The "objective marker" is the rock on the center of Lament Hill and most be captured! After all, it's worth +3 Honor points if you control it for the most turns.


As the attackers, the French will position a unit first, followed by the British, followed by the French, etc. until all units have be placed. As a summary from previous posts, here are the two forces:

French:
2 x Compaignes de la Marine that is Light Infantry at 6 points each.
1 x Large Native War Band that is Aggressive at 6 points.
1 x Coureur de Bois that are Skirmishers that are Sharpshooters at 6 points.

Total: 24 points

British:
1 x 42nd Highlanders that are a Large, Aggressive Shock Infantry at 8 points. 
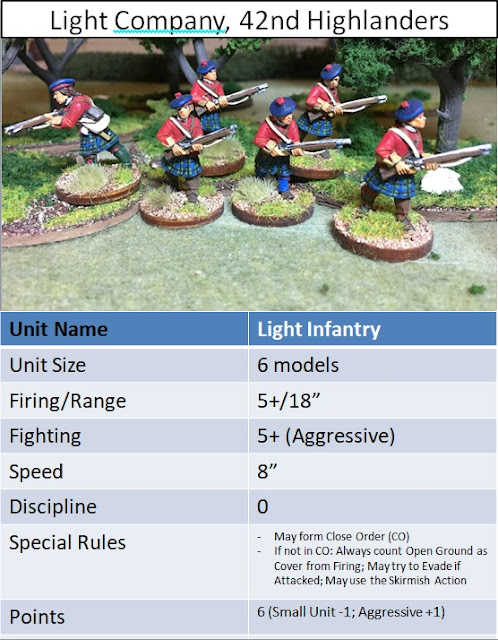
1 x 42nd Highlander Light Company that is a Small, Aggressive Light Infantry at 6 points.
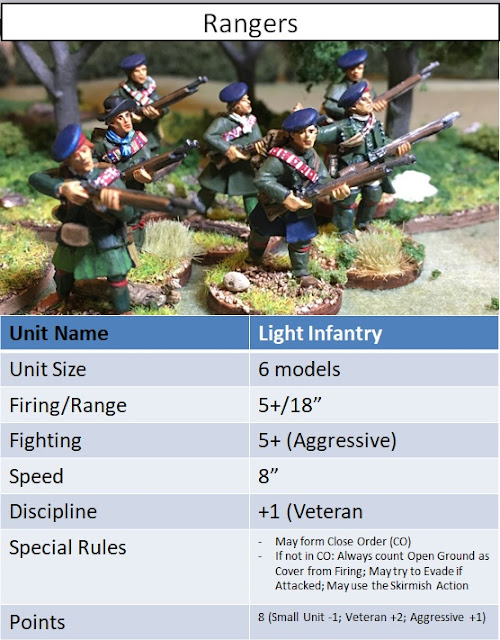
1x Ranger Unit that is a Small, Veteran and Aggressive Light Infantry at 8 points.
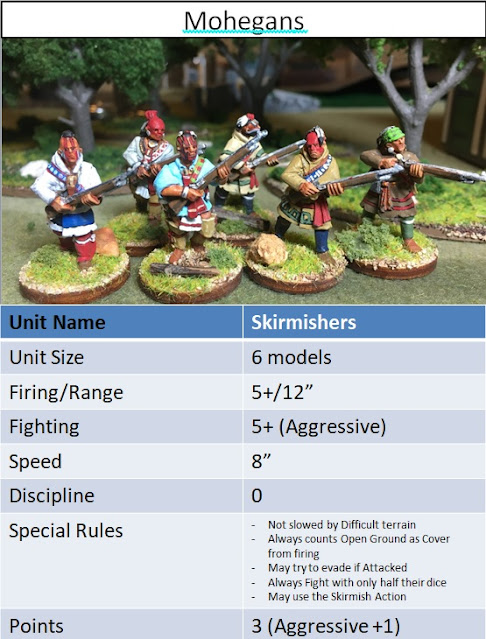
1 x Mohegan Native Scouts that are Aggressive Skirmishers at 3 points.

Total: 25 points (Lieutenant McDougall gets a free point due to his Leadership Trait)


As recommended, we did our best to keep the terrain open to get the feel of the game mechanics; but, we just had to add some trees and other terrain features on the gaming table. Above is how the terrain will affect Firing and Fighting (Attacking). The battle will be fought on an area of 4 feet by 4 feet.


Lieutenant 
Charles Deschamps de Boishebert et de Raffetot's Leadership Trait is Strategist, and since he is the attacker he decides to put the 1st Marine Company on his left flank - closer to the objective and opposite what looks like a weaker position opposite the marines only covered by the Mohegan Scouts. The marines also have the Canadian Militia, which are Sharpshooters, right behind them to back them up.

Next: The action starts!

Tuesday, November 2, 2021

British Units for our First Battle of Rebels and Patriots


"Lieutenant McDougall sir!"
"Yes Sergeant Smith."
"Sir. We've been discovered. My rangers came across some Native scouts. We killed three of them but one got away." We pushed up and saw the French. At least two companies of marines, maybe militia. And sir, there is a large war band of Hurons with them. We can't let them Hurons in the valley. They are moving to Lament Hill."
McDougall looked at the ground and then the Ranger. "Well Sergeant Smith, if they take Lament Hill and hold it, they'll control access to the whole valley."
"Yes sir."
"Send your Rangers and your Native scouts out. I'll bring up the lads and we will send those French back to Quebec."
"Sir!"
As the ranger moved out, he could already hear the pipes . . .

And now the British forces for our first epic clash of the French and Indian War using Rebels and Patriots (Paid Link):

Our Scottish Hero:


More on Lieutenant McDougall's background can be found here: McDougall.

The Units:


To Summarize:

1 x 42nd Highlanders that are a Large, Aggressive Shock Infantry at 8 points. 
1 x 42nd Highlander Light Company that is a Small, Aggressive Light Infantry at 6 points.
1x Ranger Unit that is a Small, Veteran and Aggressive Light Infantry at 8 points.
1 x Mohegan Native Scouts that are Aggressive Skirmishers at 3 points.
Total: 25 points (Lieutenant McDougall gets a free point due to his Leadership Trait)

Next: The scenario and the set-up