As an Amazon Associate I earn from qualifying purchases

Showing posts with label Citadel Paints. Show all posts

Thursday, August 28, 2025

The Boxer Rebellion Project, Part 11: Deciding on Uniform Colors for The Resolute Army

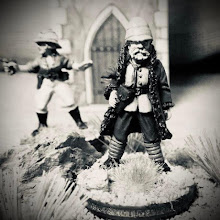
Figures from Wargames Foundry.

 In my post when I outlined my "generic" Imperial Chinese Army for The Men Who Would be Kings, I outlined that I was going to use as my template Chinese Imperial forces that faced the Second Relief Expedition under General Sir Alfred Gaselee, GCB, GCIE. For purposes of my organization of units, I'm referring to my first 2 Infantry units and my artillery gun as belonging to the Resolute Army. An Army in the Chinese Imperial Army at this time could be anything from a regiment sized force up to a Brigade/Division. As is my usual practice when painting units or armies I am not familiar, I decided to do a few test figures to figure out how I wanted the units to look.

First up will be the commander of an Infantry unit that will have more of a traditional Chinese look instead of the more Westernized units. The figure is from Wargames Foundry and is from one of the command packs from their Taiping Rebellion in China 1851-66 range. Most of the range is suitable for the Boxer Rebellion and fits in nicely with other ranges. The above officer is from Pack CH001 Chinese Command.


Military mandarins or officers wore a silk jacket in in various colors and senior officers wore predominantly purple. In addition on the front and sometimes the back, highly decorative embroidered cloth panels would be part of the jacket. In this scale, all you are getting from me is some "Chinese" lettering! Headgear was a Manchu hat often replaced with a bamboo sun hat in the summer with red tassels attached at the top.

Ready to fight enemies of the Qing Dynasty - both external and internal (though I think I need to add just a little shading to the face).

The next unit.

Next up will be my first Infantry unit which will be wearing traditional Chinese "uniforms" and once again is from Wargames Foundry Pack CH004 Chinese Musketeers. Even though they are carrying matchlocks, I'm going to pretend that they have a mixture of muskets with obsolete and modern breechloaders. The unit will be based on the above print. I forgot to mention that all of the figures were painted with a combination of Vallejo and Citadel Contrast paints.


Chinese Imperial soldiers always wore brightly colored uniforms which is one of the appeals of this period. The main garment was a loose fitting tunic of silk, cotton or linen usually bordered with a contrasting color. The tunic was issued by the unit commander but anything else worn under it was usually provided by the soldier themselves. Many troops wore a sleeveless surcoat (as above). Some "elite" units were more standardized than the other units depending on the money spent by the commander. On the chest and back of the tunic was a cloth disc, usually in white or yellow, which bore characters displaying the soldier's unit and commander and sometimes even position.


Typical headgear would be a turban worn in various styles or the classic Manchu hat. The black Manchu hat with a turned up brim and red crown were made from various materials depending on rank.


Infantry unit number 2 will wear a more Western cut of uniform though it retains aspects of a  traditional Chinese look. With uniform colors you really can't go wrong; most units wore dark blue or various shades of blue. Contemporary Western observers (when I use the term "Western Observers" I am also including the Japanese), prints (both Chinese and Western) show colors of white, yellow, green, brown, red and dark red. You can't go wrong.


The above figure is Pack CH023 Ever Victorious Army Infantry. As mentioned earlier, most troops wore various types of turbans in dark blue, blue, black and red worn by regulars. Some of the Yung units (another post in of itself) wore turbans of yellow, scarlet and dark blue. My figure's uniform is a westernized cut of a double breasted silk tunic and decorative embroidered red panels.


Yep. I need to add some shading to his face too.

Since artillery crews are only 4 figures in TMWWBKs, I decided to knock out 3 figures and I'm going to add a 4th officer figure later.


This is another "Western" style looking unit in blue with red turbans and the traditional discs. Various pictures of the time show that even within the same unit, the discs may not be of a uniform design or attached in the same place. The Wargames Foundry pack is CH024 Ever Victorious Army Artillery Crew.


Don" bother looking up the Chinese characters; I made them up based on photographs and illustrations of the time and painted what I thought would look good at gaming distance.

Now it's time to get the painting assembly line going.


Monday, July 7, 2025

The Boxer Rebellion Project, Part 6: We Need a Flag!

Naval Ensign of the Austrian-Hungarian Navy

I love flags! If I can get them on the Dining Room table (whether they were actually carried or not) I will get them on the table. Fortunately we have evidence that the Naval Ensign (flag) of the Austro-Hungarian ground contingent was carried by the sailors of the SMS Zenta and came from the ship. 

During its existence, Austria-Hungary did not have a common flag – a "national flag" could not exist since the Dual Monarchy consisted of two sovereign states. Until 1918, the War Fleet continued to carry the Austrian ensign it had used since 1786.

Naval ensign 1786–1918.

SMS Zenta in the Boxer Rebellion.

Instead of purchasing a commercial flag, this flag seemed easy to reproduce and paint. I wish I had taken pictures of what I did but I will try to summarize:

1. I used the image above as a guide and grabbed my handy-dandy rule and made a tricolor with an artists graphite pencil on regular printer paper. I did the right side of the flag first and then the left side with a small separation between them for the pole.

2. I sketched out the shield and crown sightly darker with my pencil

3. I mixed about 2/3 Vallejo Flat Red with 1/3 Vallejo Flat White and painted the red portions of the flag. As expected, I could see some of the crown through the paint of the upper portion of the flag.

4. I then used Citadel Yellow for the crown.

5. I went back to the red portions of the flag and painted them again (carefully) with Citadel Contrast Blood Angels Red.

6. After the contrast paint dried, I went back and cleaned up the crowns with the yellow and then added some red dots on the crown.


Note: I made the flag smaller than in real life.

7. Ta-Dah!


Monday, April 28, 2025

The Colonel’s Recovery Repeats: Painting White on Figures

Originally posted on July 20th, 2010 before we had the fancy paints we have now and I learned a new painting technique!


Painting white uniforms or clothing has been a challenge for me in the past as I did not want the uniforms to be white! Hunh? In other words, I wanted my figure's fabric to look textured and realistic with shadows and highlights. I have achieved that effect easily with other colors by starting with a base of black, and then wet brushing with the base color to get the desired effect. Then I would highlight with a lighter color. Unfortunately, starting with black did not get the results I wanted until I stumbled on a painting guide for "Gandalf the White" on the Games Workshop website. As I primarily use Games Workshop paints, it was perfect for me and I like the result. You can see the completed Gandalf above.

Since I am painting the British Foot Guards (sorta, I really need to finish them before the French Dragoons come), I took some quick pictures to show how I am painting the coveralls white.


After priming in black, I paint the pants with a base of GW's Bestial Brown.

Wet brush with Bone White being careful not to cover up the folds of the figure which leaves a nice shadowing effect.


Highlight with Skull white - Tah Dah! You may notice that I have not done the straps of the figure with this painting technique. I wanted the straps and lace to be "whiter" and stand out more. For this, I just use Skull white in several layers until I get the desired look.

Remember the first rule of painting - if you make a mistake, just paint over it!
Below are some French Napoleonic Troops from Wargames Foundry that I painted that illustrate the technique:


Monday, April 21, 2025

Operation Heinlein: Strike Force Commander


"As a Space Marine officer, I prefer not to wear my helmet into combat. Heads up displays, thermal imagery, communication nets, real time location and the status of my Marines - plus the protection it provides are for sissies. Plus I can see my chain sword better without it.


As a follow-up to my earlier post on painting armored infantry, unh Space Marines copyright by Games Workshop with blood oaths, Dwarven runes and Chaos Demon lawyers, I finally found the commander for my Armored Infantry Strike Force commander for Xenos Rampant.


I was able to get the Boardgame “Space Marines” which is sold exclusively at Target or online from GW for the ridiculously low price of $25 US dollars. It’s actually a fun, fast game and comes with Lieutenant Titus of the Ultramarines and 10 Tyranid termagants and 3 ripper swarms. It pays to wait for sales.


Lieutenant Titus will get a new name for Xenos Rampant. I did the figure just using Citadel Contrast (CC) paints and as always use a quality primer! In this case I use Citadel Bone Wraith. There is a little paint on his face because I wanted to get a picture of the primed figure and almost forgot.


For the skin I used a base of Vallejo Dark Flesh and then added a wash of CC Darkoath Flesh for shading and detailing. 


The chain sword (let’s face it, chain swords are ridiculous but cool) is painted with CC Black Templar.


It’s time for CC Ultramarine Blue for the armor. I’m not worried about a smooth, even application as I want the armor to look like it’s been used in combat and not on the parade field.


The star burst is CC Blood Angel Red and I later cleaned it up with Vallejo Flat Red. 

The blue hanging rectory weird GW bone box I’m going to pretend it is a medical kit. I painted it with CC Aethermatic Blue and all of the leather is painted with CC Snakebite Leather.


The scroll under the skull is Striking Scorpion Green, the battle honor strips are CC Skeleton Horde with the seals CC Blood Angel Red. The skull on the base is also CC Skeleton Horde and the STUPID loin cloth, one more thing to get stuck in combat, is CC Nazdreg Yellow. The hilt on the chain sword is Vallejo Shiny Gold.


The wreath is also CC Striking Scorpion Green.


The concrete is CC Space Wolves Grey and the pipe will be eventually painted with CC Basilicum Grey.


I forgot to mention that the weapon and other bare metal is CC Basilicum Grey.

I used my usual basing mix of various sizes of railroad hobby ballast. I painted the base color Vallejo Luftwaffe Uniform WWII and dry brushed Vallejo Neutral Grey followed by Vallejo Light Grey.


The side of the base is Vallejo Flat Brown.


Always keep those bits. Since the leader has a larger base, I added a Necron arm to give it a little jazz.


Regular ole green static grass from Gale Force 9.


Ta Dah!