As an Amazon Associate I earn from qualifying purchases

Showing posts with label Vallejo Paints. Show all posts

Thursday, August 28, 2025

The Boxer Rebellion Project, Part 11: Deciding on Uniform Colors for The Resolute Army

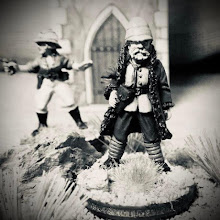
Figures from Wargames Foundry.

 In my post when I outlined my "generic" Imperial Chinese Army for The Men Who Would be Kings, I outlined that I was going to use as my template Chinese Imperial forces that faced the Second Relief Expedition under General Sir Alfred Gaselee, GCB, GCIE. For purposes of my organization of units, I'm referring to my first 2 Infantry units and my artillery gun as belonging to the Resolute Army. An Army in the Chinese Imperial Army at this time could be anything from a regiment sized force up to a Brigade/Division. As is my usual practice when painting units or armies I am not familiar, I decided to do a few test figures to figure out how I wanted the units to look.

First up will be the commander of an Infantry unit that will have more of a traditional Chinese look instead of the more Westernized units. The figure is from Wargames Foundry and is from one of the command packs from their Taiping Rebellion in China 1851-66 range. Most of the range is suitable for the Boxer Rebellion and fits in nicely with other ranges. The above officer is from Pack CH001 Chinese Command.


Military mandarins or officers wore a silk jacket in in various colors and senior officers wore predominantly purple. In addition on the front and sometimes the back, highly decorative embroidered cloth panels would be part of the jacket. In this scale, all you are getting from me is some "Chinese" lettering! Headgear was a Manchu hat often replaced with a bamboo sun hat in the summer with red tassels attached at the top.

Ready to fight enemies of the Qing Dynasty - both external and internal (though I think I need to add just a little shading to the face).

The next unit.

Next up will be my first Infantry unit which will be wearing traditional Chinese "uniforms" and once again is from Wargames Foundry Pack CH004 Chinese Musketeers. Even though they are carrying matchlocks, I'm going to pretend that they have a mixture of muskets with obsolete and modern breechloaders. The unit will be based on the above print. I forgot to mention that all of the figures were painted with a combination of Vallejo and Citadel Contrast paints.


Chinese Imperial soldiers always wore brightly colored uniforms which is one of the appeals of this period. The main garment was a loose fitting tunic of silk, cotton or linen usually bordered with a contrasting color. The tunic was issued by the unit commander but anything else worn under it was usually provided by the soldier themselves. Many troops wore a sleeveless surcoat (as above). Some "elite" units were more standardized than the other units depending on the money spent by the commander. On the chest and back of the tunic was a cloth disc, usually in white or yellow, which bore characters displaying the soldier's unit and commander and sometimes even position.


Typical headgear would be a turban worn in various styles or the classic Manchu hat. The black Manchu hat with a turned up brim and red crown were made from various materials depending on rank.


Infantry unit number 2 will wear a more Western cut of uniform though it retains aspects of a  traditional Chinese look. With uniform colors you really can't go wrong; most units wore dark blue or various shades of blue. Contemporary Western observers (when I use the term "Western Observers" I am also including the Japanese), prints (both Chinese and Western) show colors of white, yellow, green, brown, red and dark red. You can't go wrong.


The above figure is Pack CH023 Ever Victorious Army Infantry. As mentioned earlier, most troops wore various types of turbans in dark blue, blue, black and red worn by regulars. Some of the Yung units (another post in of itself) wore turbans of yellow, scarlet and dark blue. My figure's uniform is a westernized cut of a double breasted silk tunic and decorative embroidered red panels.


Yep. I need to add some shading to his face too.

Since artillery crews are only 4 figures in TMWWBKs, I decided to knock out 3 figures and I'm going to add a 4th officer figure later.


This is another "Western" style looking unit in blue with red turbans and the traditional discs. Various pictures of the time show that even within the same unit, the discs may not be of a uniform design or attached in the same place. The Wargames Foundry pack is CH024 Ever Victorious Army Artillery Crew.


Don" bother looking up the Chinese characters; I made them up based on photographs and illustrations of the time and painted what I thought would look good at gaming distance.

Now it's time to get the painting assembly line going.


Monday, July 7, 2025

The Boxer Rebellion Project, Part 6: We Need a Flag!

Naval Ensign of the Austrian-Hungarian Navy

I love flags! If I can get them on the Dining Room table (whether they were actually carried or not) I will get them on the table. Fortunately we have evidence that the Naval Ensign (flag) of the Austro-Hungarian ground contingent was carried by the sailors of the SMS Zenta and came from the ship. 

During its existence, Austria-Hungary did not have a common flag – a "national flag" could not exist since the Dual Monarchy consisted of two sovereign states. Until 1918, the War Fleet continued to carry the Austrian ensign it had used since 1786.

Naval ensign 1786–1918.

SMS Zenta in the Boxer Rebellion.

Instead of purchasing a commercial flag, this flag seemed easy to reproduce and paint. I wish I had taken pictures of what I did but I will try to summarize:

1. I used the image above as a guide and grabbed my handy-dandy rule and made a tricolor with an artists graphite pencil on regular printer paper. I did the right side of the flag first and then the left side with a small separation between them for the pole.

2. I sketched out the shield and crown sightly darker with my pencil

3. I mixed about 2/3 Vallejo Flat Red with 1/3 Vallejo Flat White and painted the red portions of the flag. As expected, I could see some of the crown through the paint of the upper portion of the flag.

4. I then used Citadel Yellow for the crown.

5. I went back to the red portions of the flag and painted them again (carefully) with Citadel Contrast Blood Angels Red.

6. After the contrast paint dried, I went back and cleaned up the crowns with the yellow and then added some red dots on the crown.


Note: I made the flag smaller than in real life.

7. Ta-Dah!


Monday, April 21, 2025

Operation Heinlein: Strike Force Commander


"As a Space Marine officer, I prefer not to wear my helmet into combat. Heads up displays, thermal imagery, communication nets, real time location and the status of my Marines - plus the protection it provides are for sissies. Plus I can see my chain sword better without it.


As a follow-up to my earlier post on painting armored infantry, unh Space Marines copyright by Games Workshop with blood oaths, Dwarven runes and Chaos Demon lawyers, I finally found the commander for my Armored Infantry Strike Force commander for Xenos Rampant.


I was able to get the Boardgame “Space Marines” which is sold exclusively at Target or online from GW for the ridiculously low price of $25 US dollars. It’s actually a fun, fast game and comes with Lieutenant Titus of the Ultramarines and 10 Tyranid termagants and 3 ripper swarms. It pays to wait for sales.


Lieutenant Titus will get a new name for Xenos Rampant. I did the figure just using Citadel Contrast (CC) paints and as always use a quality primer! In this case I use Citadel Bone Wraith. There is a little paint on his face because I wanted to get a picture of the primed figure and almost forgot.


For the skin I used a base of Vallejo Dark Flesh and then added a wash of CC Darkoath Flesh for shading and detailing. 


The chain sword (let’s face it, chain swords are ridiculous but cool) is painted with CC Black Templar.


It’s time for CC Ultramarine Blue for the armor. I’m not worried about a smooth, even application as I want the armor to look like it’s been used in combat and not on the parade field.


The star burst is CC Blood Angel Red and I later cleaned it up with Vallejo Flat Red. 

The blue hanging rectory weird GW bone box I’m going to pretend it is a medical kit. I painted it with CC Aethermatic Blue and all of the leather is painted with CC Snakebite Leather.


The scroll under the skull is Striking Scorpion Green, the battle honor strips are CC Skeleton Horde with the seals CC Blood Angel Red. The skull on the base is also CC Skeleton Horde and the STUPID loin cloth, one more thing to get stuck in combat, is CC Nazdreg Yellow. The hilt on the chain sword is Vallejo Shiny Gold.


The wreath is also CC Striking Scorpion Green.


The concrete is CC Space Wolves Grey and the pipe will be eventually painted with CC Basilicum Grey.


I forgot to mention that the weapon and other bare metal is CC Basilicum Grey.

I used my usual basing mix of various sizes of railroad hobby ballast. I painted the base color Vallejo Luftwaffe Uniform WWII and dry brushed Vallejo Neutral Grey followed by Vallejo Light Grey.


The side of the base is Vallejo Flat Brown.


Always keep those bits. Since the leader has a larger base, I added a Necron arm to give it a little jazz.


Regular ole green static grass from Gale Force 9.


Ta Dah!


Friday, April 18, 2025

Lt. Col. Shiba Gorō


Whoops. I forgot to paint his mustache. A great figure of a Japanese officer from Crusader Miniatures.

Shiba Gorō (柴 五郎, June 21, 1860 – December 13, 1945) was a samurai of Aizu Domain and later a career officer and general in the Meiji period Imperial Japanese Army. Shiba Gorō witnessed the events of the Boshin War as a child when Aizu was attacked by the imperial forces in 1868. With the abolition of the Han system, he moved to Tokyo and enlisted in the fledgling Imperial Japanese Army in 1873. He was in the 1877 class of the Imperial Japanese Army Academy and was commissioned as a second lieutenant in the artillery in 1879.


I’m not going to cover this remarkable warrior's entire career but focus on the Boxer Rebellion and the Russian Japanese War. In March 1900, Shiba returned to Beijing as a military attaché, and was thus present at the Japanese legation during the Boxer Rebellion. There his small force fought tenaciously and suffered almost 100% casualties over a 60 day period. He served with distinction during that campaign, aided by his prior knowledge of Beijing and by a large network of local spies. He protected the citizens and diplomats alongside several Western powers during the siege, and was subsequently awarded decorations by many of the western nations in the Eight-Nation Alliance. Shiba's role in the Boxer Rebellion is often highlighted in Western accounts of the conflict. In the 1963 film 55 Days at Peking about the siege of international legations he is a supporting character, played by future director Juzo Itami.


In March 1901, he was returned to Japan and attached to the General Staff. In June 1901 Shiba was appointed commander of the IJA 15th Field Artillery Regiment, which he continued to command after the start of the Russo-Japanese War in 1904, where he was awarded the Order of the Golden Kite (2nd class), for bravery in battle.

Here is my painting guide for Lieutenant Colonel Shiba Gorō which, with minor changes, will be used for my other Japanese Infantry.


For 28mm figures I like to glue them to soda caps with all purpose white glue for easy handling. Wait for the glue to dry! I first painted the flesh CC Darkoath Flesh and I was quite pleased with the results.


When I’m trying to work out which paint colors to use on a new unit/army I rarely use an officer figure; but this Crusader Miniature looked so cool I had to give it a try. My gut feel for the uniform was to use a base of Vallejo Prussian Blue and then to highlight with Vallejo Dark Blue. And then I said to myself, “Self, let’s try a heavy coat of Citadel Contrast (CC) Ultramarine Blue. When using contrast/speed paints it’s important to use a quality primer (trust me on this one!). I used Citadel Wraithbone.


He wears the dark blue Atilla blouse and the black braid (it’s hard to see in this picture), boots and cap brim are CC Black Templar. I initially used CC Blood Angels Red but I realized I would need to use Vallejo Flat Red with a detail brush to simulate the finer, well, details. Oh by the way, there was no way I was going to try painting the Austrian loops on the sleeve. The red (technically scarlet) indicates a member of the Imperial Guard.


After doing more research, I realized that I made the trouser stripe too narrow. As a field grade office it should be about twice as wide. I’ll fix that later.


It was also at this time (nothing like carefully checking before you paint!) that he should also have 2 rings on his cap as a Lieutenant Colonel and two stars on the front of the cap. All leather is also CC Templar Black.


As mentioned earlier, I used Vallejo Flat Red to clean up the cap and Vallejo Shiny Gold for the stars. He carries the M1888 officers sword and I used Vallejo Shiny Gold for the details and Vallejo Silver for the scabbard.

I used Vallejo Flat White to make the trouser stripe wider and used CC Blood Angels Red for the stripe. The figure is glued to a 25mm Litko wood base and I used my normal sand mixture and static grass to finish the base. Don’t forget to protect the figure with a clear matte spray.