As an Amazon Associate I earn from qualifying purchases

Showing posts with label Hard Plastic Miniatures. Show all posts

Tuesday, July 22, 2025

The Boxer Rebellion Project, Part 8: A Generic Imperial Chinese Field Force


 Now that I have more than a start on the 8 Nations Alliance for the Boxer Rebellion, it's time to turn my attention to the Imperial Chinese Army and the Boxers. I'm a great fan of The Men Who Would be Kings which is my kind of Colonial Colonial Gaming. In researching my army, I'm also going to give a nod to making the Field Force as colorful and with as many flags as possible. My army will be semi-historical with an eye to gaming and having fun.

Right now I'm focusing on forces during the Second Relief Force when the 8 Nations Alliance forces under Lt. General Sir Alfred Gaselee marched on Peking to relieve the Internation Legaitions. Once the Taku Forts were taken, the Imperial Chinese, which had forces actively fighting the Boxers, viewed the action as a declaration of war and the Boxers started to take a back seat to the Imperial Army. But hey, we are going to have lots of Boxers for the Imperial Chinese commander as cannon fodder, um, ahem, as loyal citizens helping the Qing Dynasty.

A nice photo from the National Army Museum in the UK picturing Manchu hat wearing Imperial infantry.

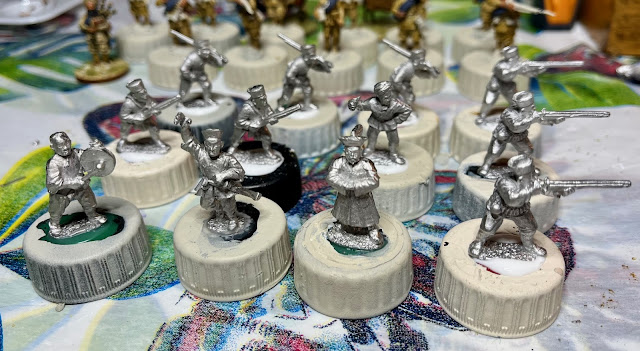
Imperial Chinese Infantry Unit #1 (they'll get names later) from Wargames Foundry's the Taiping Rebellion in China 1851-66 range sculpted by Michael and Alan Perry.

1. Chinese Imperial Infantry Unit.
    Irregular Infantry: 4 points.
    Poor Shots: - 1 point.
    Total: 3 points.


I've been looking at uniform references for my Manchu hat wearing infantry and I'm leaning toward painting the unit as one of the two above.


Chinese Ever Victorious Army from the Taiping Rebellion range that will be later Chinese Imperial Infantry. The figures from the range make great proxies for the Boxer Rebellion in 28mm.

2. Chinese Imperial Infantry Unit.
    Irregular Infantry: 4 points.
    Poor Shots: - 1 point.
    Total: 3 points.

I wanted one unit with Manchu hats and one with turbans. My unit with turbans will have a dark blue uniform with black turbans.

3. Chinese Imperial Infantry Unit: The Kansu Braves. How can you not have a Chinese army without the Kansu Braves!
    Irregular Infantry: 4 points.
    Poor Shots: - 1 point.
    Veteran: +1 point.

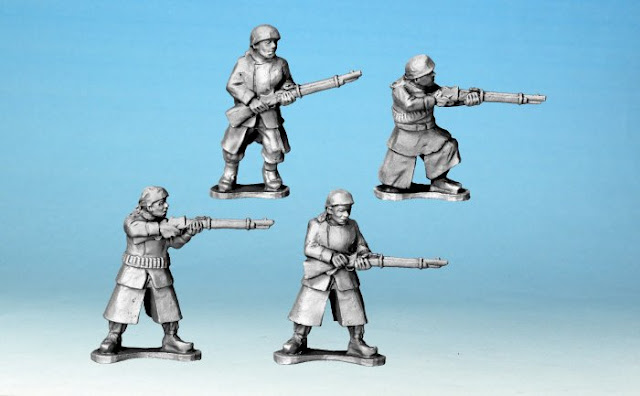
I'm going to use the Kansu Braves from Crusader Miniatures - pictures from Crusader Miniatures website.


I gave the Kansu Braves veteran status as they had pretty good staying power during the Boxer Rebellion.

4. Chinese Boxers x 2.
    Tribal Infantry: 3 points.
    Fierce: 1 point.
    Total: 4 points.

My Boxers will be hard plastics from Wargames Atlantic with a few metal figures thrown in.


5. Imperial Chinese Artillery.
    Well drilled: 6 points.
    Total: 6 points.

Figures again from Wargames foundry and the man in charge of the gun is going to wear his fancy armor!

Looks like some of the artillery was at least average in performance though further research is warranted. I'll probably paint them in the famous, classic uniform from the cigar box cards.


To recap my generic Imperial Chinese Field Force for The Men Who Would be Kings:

1. Chinese Imperial Infantry Unit # 1 (Irregular Infantry, Poor Shots): 3 points.
2. Chinese Imperial Infantry Unit #2 (Irregular Infantry, Poor Shots): 3 points.
3. Kansu Braves (Irregular Infantry, Poor Shots, Veterans): 4 points.
4. Boxer Unit #1 (Tribal Infantry, Fierce): 4 points.
5. Boxer Unit #2 (Tribal Infantry, Fierce): 4 points.
6. Chinese Artillery (Well Drilled): 6 points.

Total: 24 points.
72 figures and 1 gun.


Monday, April 21, 2025

Operation Heinlein: Strike Force Commander


"As a Space Marine officer, I prefer not to wear my helmet into combat. Heads up displays, thermal imagery, communication nets, real time location and the status of my Marines - plus the protection it provides are for sissies. Plus I can see my chain sword better without it.


As a follow-up to my earlier post on painting armored infantry, unh Space Marines copyright by Games Workshop with blood oaths, Dwarven runes and Chaos Demon lawyers, I finally found the commander for my Armored Infantry Strike Force commander for Xenos Rampant.


I was able to get the Boardgame “Space Marines” which is sold exclusively at Target or online from GW for the ridiculously low price of $25 US dollars. It’s actually a fun, fast game and comes with Lieutenant Titus of the Ultramarines and 10 Tyranid termagants and 3 ripper swarms. It pays to wait for sales.


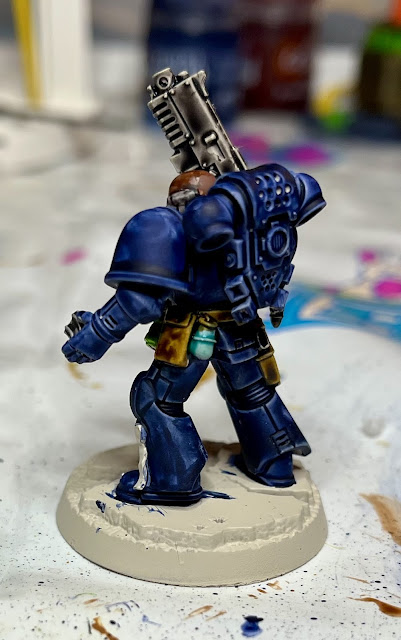
Lieutenant Titus will get a new name for Xenos Rampant. I did the figure just using Citadel Contrast (CC) paints and as always use a quality primer! In this case I use Citadel Bone Wraith. There is a little paint on his face because I wanted to get a picture of the primed figure and almost forgot.


For the skin I used a base of Vallejo Dark Flesh and then added a wash of CC Darkoath Flesh for shading and detailing. 


The chain sword (let’s face it, chain swords are ridiculous but cool) is painted with CC Black Templar.


It’s time for CC Ultramarine Blue for the armor. I’m not worried about a smooth, even application as I want the armor to look like it’s been used in combat and not on the parade field.


The star burst is CC Blood Angel Red and I later cleaned it up with Vallejo Flat Red. 

The blue hanging rectory weird GW bone box I’m going to pretend it is a medical kit. I painted it with CC Aethermatic Blue and all of the leather is painted with CC Snakebite Leather.


The scroll under the skull is Striking Scorpion Green, the battle honor strips are CC Skeleton Horde with the seals CC Blood Angel Red. The skull on the base is also CC Skeleton Horde and the STUPID loin cloth, one more thing to get stuck in combat, is CC Nazdreg Yellow. The hilt on the chain sword is Vallejo Shiny Gold.


The wreath is also CC Striking Scorpion Green.


The concrete is CC Space Wolves Grey and the pipe will be eventually painted with CC Basilicum Grey.


I forgot to mention that the weapon and other bare metal is CC Basilicum Grey.

I used my usual basing mix of various sizes of railroad hobby ballast. I painted the base color Vallejo Luftwaffe Uniform WWII and dry brushed Vallejo Neutral Grey followed by Vallejo Light Grey.


The side of the base is Vallejo Flat Brown.


Always keep those bits. Since the leader has a larger base, I added a Necron arm to give it a little jazz.


Regular ole green static grass from Gale Force 9.


Ta Dah!


Thursday, April 17, 2025

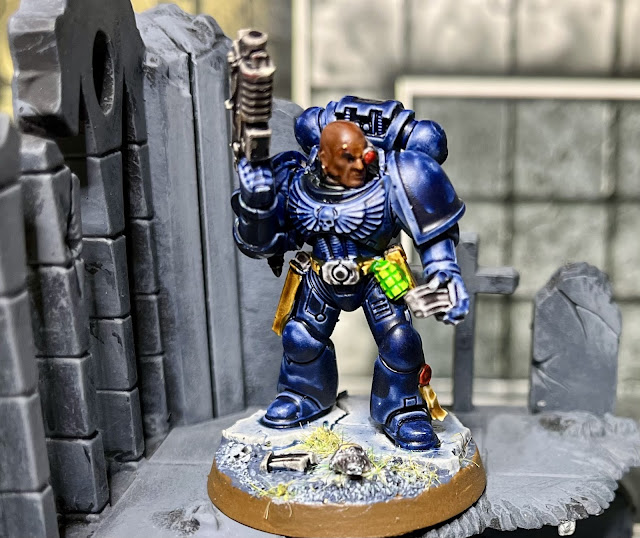
Operation Heinlein: Quick and Easy Painting guide for Armored Infantry


Okay; it’s a Space Marines (Copyright Games Workshop and if you don’t believe me I have some Demonic Chaos Lawyers to send your way). I’m building an armored infantry force of the Terran Federation for the game Xenos Rampant with GW deals I have been finding.


I’m a minimalist when it comes to painting Space Marines. For me, less is better and I don’t want the armor to be a “perfect” paint job! We are not on parade - we are wearing armor that has seen some action. Somehow to me, they look more intimidating.

I’m not sure when, but GW was selling random Blood
Angels that cameone to a box. I scarp this one up for $2 US dollars.


1. I used Citadel Contrast (CC) paints for this figure. When using enamels, you can use a lower quality primer. But for Contrast or Speed Paints, it’s well worth the money to invest in a good quality primer. I use Citadel Wraith Bone.

When painting my armored infantry I don’t get to concerned if the original color of the plastic shows - it will appear as “battle worn.”


2. I did the skin using a 50/50 mix of Vallejo Dark Flesh and Mahogany Brown.


3. Next up on the skin is a thin “wash” of CC Darkoath Flesh.


4. You guessed it! Paint the armor with CC Ultramarine. The inside of the armor is CC Black Templar.


5. The bolter (weapon) and other metal parts are done with CC Basilicum Grey. The belt, holster, and other leather pouches I used CC Snakebite Leather. The grenade in front was painted with Striking Scorpion Green and the grenade in the back is CC Aethermatic Blue.


6. The targeting device lense is CC Blood Angels Red and the concrete on the base is CC Space Wolves Grey.


7. The basing material I use for the ground are various grades of model railroad ballast mixed together. I put several globs of white glue on the base, grab an old handy dandy brush and I dip in water and then spread the glue so it’s watered down. I dip it in my “sandbox” container and then let it dry.

The color scheme I used was a base of Vallejo Luftwaffe Uniform WW II and then I dry brush Vallejo Neutral Grey followed by Vallejo Light Grey. After all of that is dry I add some green static grass with watered down white glue.


8. Last but not least Contrast paints can be shiny. To protect the paint and tone down the shine, I use a clear matte spray to finish it up.


Ta Dah!


Slowly but surely my Armored Infantry is getting ready for Xenos Rampant.