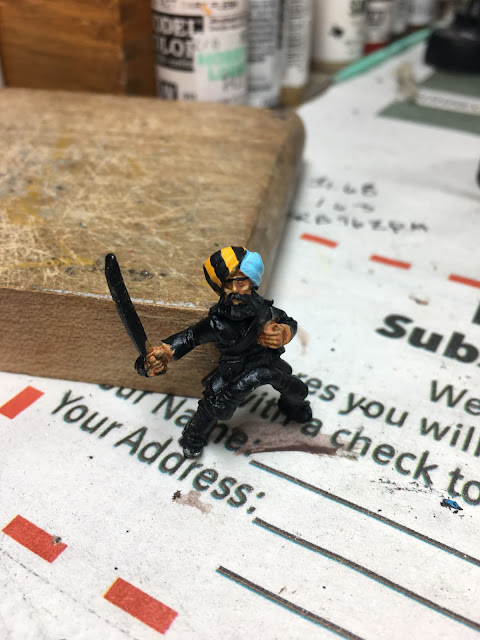
Whenever I paint a new period or a new type of figure (in this case both!), I usually paint a test figure to work out the colors and how I want the unit to look. Since I was working on a Sikh cavalry squadron of the 3rd Regiment of Bombay Light Cavalry for The Men Who Would be Kings. I thought to myself, "Self, while you document the colors in your handy dandy notebook, why not use the camera on your phone to capture the steps of how you painted the figure?" At the time I was doing this, I was also working on a unit of French Marines for the French and Indian War, so that allowed the paint to dry before moving on to the next step.
For the unit I am painting I purchased two packs of Artizan Designs NW0110 Sikh Cavalry and one pack of NWF0109 Sikh Cavalry Command. They can be purchased in the United States at Brigade Games or direct from Artizan Designs in the UK. Above is a figure from pack NW0110. I don't know if it is me, but lately it appears that the 2nd Afghan Range from Artizan has more flash, mold lines and pock marks than they used to. I don't know if there is an issue with the molds or the casting process (and they are good figures!) but it took a lot of filing and prep time to get figures and horses ready for painting.

I have only a few simple cardinal rules for myself when I paint and what I pass on to others. One of them is ALWAYS USE A PRIMER! I won't get into the debate on which color primer is the best, but paint sticks to paint. Most of the time I use black primer because black can hide a multitude of painting sins - but I also use white, brown and grey. The black primer I use is just US $1.19 a can - you don't need the fancy hobby store primer if you want to save money.
Here are my rules when I paint a figure:
1. Always use a primer.
2. Paint the figure for gaming distance; i.e., what will the figure look like at a distance while you are gaming? My eyes are getting older and this works perfectly fine for me - every figure does not need to be a miniature work of art.
3. It's your army. You bought it. Paint it how you want. If you want to use 3 color blending that's cool; if you just want to use one color with no shading that's fine too. Paint to your comfort level. To be honest, sometimes I'm lazy and sometimes I want to do it fast and that determines often how I paint.
4. If you make a mistake, don't worry about it - just paint it over.
I like to paint the face first and I always look at photographs of what people look like. Fortunately I have a friend who is Sikh - but I promised I wouldn't say his name! He laughs when I call him my male model but he doesn't want his name out. All paints are Vallejo unless otherwise noted. For the base of the skin I used Dark Flesh.
Next I used a slightly watered down GW Ratskin Flesh (or whatever they are calling the color now. It's the one that used to be Dwarf Flesh but I can't keep up with the names anymore)>
Next I made my own wash of watered down Dark Brown.
I then went back and highlighted the high points of the face and other parts of the skin with Dark Flesh again. I probably spend more time on the faces than other parts of the figure because for me, it sets the tone and "personality" of the figure as I paint. I usually don't do eyes these days and just let the shading do the trick (Gaming Distance).
One of the challenges I have with cavalry is do I glue the figure to the horse and paint them together or do I paint them separately or glue the figure on the horse later in the process? This time I waited to glue the figure later since I had a turban with stripes to paint and I think it would have been harder to paint if he was glued to the horse. I used GW Golden Yellow or whatever GW calls it now (which is actually darker than the picture) with two coats on one side and Sky Blue on the other. I discovered by accident that Sky Blue is an excellent base color to use for dark colors that you don't want to look to dark; e.g. Dark Green looking black at gaming distance.
Make some black vertical stripes wide enough to allow two stripes inside the black later on. I used Flat Black for this. Don't worry if it isn't perfect; you can always paint over if you are off a little or remember, it doesn't look perfect in the field.
Here is the side. The figure is not glued to the horse; I'm just using the horse as a stand to allow the figure to dry.
I have no idea what the back of a turban looks like as all the pictures are always from the front. So this is what mine looks like.
I'm showing the turban a lot from different angles because it is the turban that is going to draw the eye to the figure/unit when gaming.
One more view of the steely eyed cavalryman charging right at you!
Inside the black parts of the turban, paint Flat White.
Now you can see how I cheat. I painted a smaller vertical stripe inside the white with Dark Blue. Then I went back and painted a Flat White stripe in the middle and one on each side of the Dark Blue. I find this easier than trying to paint dark stripes and white is easier to fix.
See how it now looks?
I used Dark Green over the Sky Blue and you can see already how the Sky Blue is highlighting and making the Dark Green look brighter.
The base I usually use for khaki uniforms is Yellow Ochre. Great for WW II German tanks too.
For the blanket roll and puttees I use, again, a lighter color as a bash - the good ole Dark Blue. I also painted the cummerbund (I now there is another name and I need to look it up) Flat Red. The saddle cloth, which is hard to see in this picture, was painted Luftwaffe Grey. Unfortunately you can see some of the pock marks on the horse in this picture from the casting process and I was out of green stuff to fill holes.
I have now painted the blanket roll and puttees Prussian Blue which is a really dark blue but lightened by the Dark Blue under it. The leather on the figure has been painted Leather Brown and the horse is Flat Brown. The second coat on the uniform is MSP Desert Tan.
I started mixing and matching other browns to break up the monotony of all of the brown. For the horse I made a wash of Chocolate Brown and then highlighted with Flat Brown. The harness is also Flat brown and the metal is Brass except for the bit, stirrups and the spurs which are Silver. I added, every so carefully, some highlights of Flat Green to the Dark Green on the Turban. I left the boots black. I have seen photos of black boots and brown boots, but I thought this figure had enough brown. The figure is still not glued to the horse. The sword is Silver. I also gently added some Light Grey highlights to the beard and mustache and the horses hair. I also used the same color to border the saddle clothe.
And this is why he is not glued to the horse yet. I learned the hard way to have the figure on the horse and then make sure the attachments are where you want them, then glue the figure!
I trimmed off the basket handle off the scabbard since his sword is already drawn. The pouch on the back is Flat Black.
Here is the carbine. You have probably notice that neither the scabbard or the carbine is primed. Dang it! Forgot to do that before I glued them on with super glue. The figure is now glued.
Well . . . I carefully primed the scabbard and carbine. When I painted them, I painted the scabbard and the carbine stock Mahogany Brown and the carbine holder (?) Leather Brown. Time to put it on the base. I use white glue and this is a 40mm round Litko base. Tah Dah! All done. Some basing material and I think it will serve the British Raj quite nicely.


No comments:
Post a Comment