On Picket Duty
1. Let's do some Perry Miniatures Highlanders. Always, and I mean always, prime your figure. Paint sticks better to paint and it will make your life a lot easier. It really doesn't matter if you use white, black, brown or grey. That's up to you and what style or painting technique you are using. For the Gordons, I'm using white primer as I have been experimenting with GW Contrast paints and they only work with white to grey.
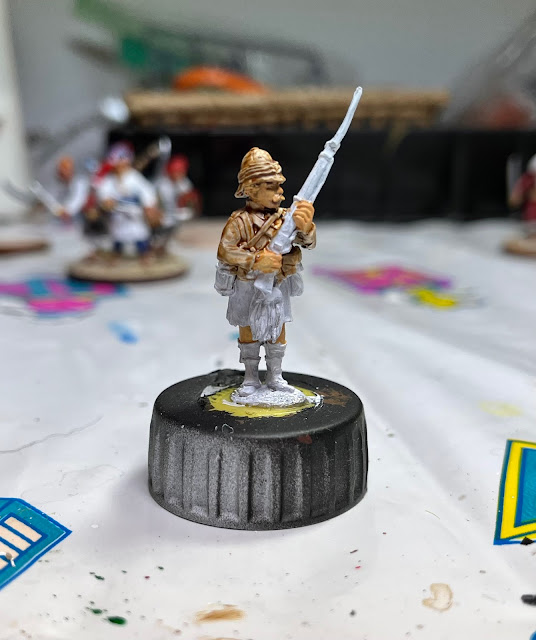
3. Time for some Contrast paint. GW Contrasts and their counterparts with other companies require and different, and faster, painting style than I am used to doing. So far, after practice, they have done the job for my Colonial troops. I used Contrast Skeleton Horde for the helmet, uniform jacket, gaiters, canteen and the cantle (the cantle is the upside down, half moon shaped piece on the front of the kilt on the sporran). As this was a test figure, I forgot to paint the canteen, gaiters and cantle until later.
4. Use Contrast Darkoath (BWAH HAH HAH) Flesh on all of the skin. I feel this does a good job of shading over the Vallejo Dark Flesh. Hey! And we remembered to paint the gaiters.
5. I used Contrast Snakebite Leather for the Slade-Wallace equipment and that dapper mustache on the Perry figurePerry figure.
Starting to look imposing! And I noticed the cantle (Contrast Skeleton Horde). The Sergeant Major will be grudgingly proud.
Haversack strap in the front painted Vallejo Buff. Yeah. It looks better. All the rest of the photos will have the Deck Tan - just pretend it's Buff.
8. For the base of the kilt I used Vallejo Dark Blue. The actual Gordon kilt should have a darker blue, but I have discovered that some dark colors at a distance just don't look great so I usually make them a shade lighter so you can tell what they are.
9. The mess kit on the back was painted Contrast Basilicanum Grey. Please don't make me research the GW website to figure out what a Basilicanum is one of their universes.
11. Pick your silver type metal of choice for the rifle. I used Vallejo Silver and Gold but first painted the areas with Flat Black before applying the silver and gold. Metal colors seem to always look better when painted on black. I also used Flat black for the cross hatch on the hose, the boots, bayonet scabbard and the tail thingies hanging from the gold thingies on the sporran.
Yep. Finally noticed the canteen. As a reminder I used Contrast Skeleton Horde.
Okay. Please ignore the completed figure above except for the haversack. I thought the haversack looked a little light in color for my taste. As I checked my paints and notes, I realized that I had painted the haversack with Vallejo Deck Tan instead of Vallejo Buff. After I took all of the photos, I went back and painted it Buff. Nothing wrong with using Deck Tan or something similar; I just think Buff looks better.


The kilted preview looks good, I await your method! The truth is, at any reasonable distance most kilts would be a vague impression of the two main colors at most, thus our gamer short cuts on these iconic garments a compromise between appearance, realism, and practicality. More an impression of the Tartan, which works perfectly fine!
ReplyDeleteI agree. My beautiful 15mm Napoleonic Highlanders looked like that were wearing black kilts while gaming. I usually use just three colors and it looks pretty good at 28mm.
DeleteGreat lesson. Thank you!
ReplyDeleteThanks John!
DeleteThanks Neil. Great tutorial on using the contrast paint and regular ones. Curious what color you used for the rifle. I may have missed it. Skeleton Horde is my go to for almost all shading these days.
ReplyDeleteWhoops! I did leave that out. I used GW Contrast Cygor Brown.
Delete